Showing posts with label Windows xp. Show all posts

Monday, 2 June 2014

How To Install Windows 7, 8 or XP From USB?

Install Windows for USB
You may hear some news or rumors about installing Windows from USB (Universal Serial Bus). Some of the bloggers may give you more difficult way. Some visitors may not succeed.......I'm going to show you, How to Install Windows From USB, In most simplest Way...

Procedure:

1. First of all, you'd have windows' ISO File in your PC.
2. Now, you've to download a software.
3. Install it.
4. Open it.
5. Connect USB Drive.
6. Command the software to copy ISO file of USB Drive.
7. It will automatically copy and Create a Bootable USB Drive.
8. It may ask you to format the drive first. So, let it to do its work.
9. Before copying, don't forget to turn off anti-virus protection. Because it copies some files, that may seem harmful to anti-virus. So, first disable it.
10. After copying, the job is done.
11. You have to configure your computer, when it starts. You have to go to your PC's boot menu, and then select boot for USB Drive.
12. It will start installing windows....
Any Question in your mind? You can ask me by commenting below....:)

Download Links for Software:

For Windows vista, 7, etc.

For Windows XP:

Continue Reading >>

Sunday, 20 April 2014

Translating a Subtitle Using Google Translate!

Now, you can translate a subtitle in your own region language. Let's start it.

Procedure:

1# Open downloaded subtitle.
2#  Now copy all the data in it.
3#  Now, go to Google Translate
4#  Paste them.
5# It will instantly translate it. You can also disable it by going at bottom and clicking on Disable instant translate.
6# After translating, You have to copy the translated data.
7# Go to your opened notepad window. Select all and replace them with it.
8# Now, you have to just replace two things to make the file useful
  • Replace -> with -->
  • Replace ، with ,
9# You have done your Job Enjoy.. But remember you have to translate and paste it on the same document. You can't make a new file and save it, it will give UNICODE saving error. 
Continue Reading >>

Monday, 7 April 2014

How to Add and Play A Subtitle In VLC Media Player?

Subtitles Logo OR Symbol
Ah! I'm posting, after a long time. Actually, in these days I remain busy in studying. I'm a student. O.K.
In this post you will be able to install and view a movie with its subtitles.....First of All, you should know about subtitles:
"They are the captions displayed at the bottom of a cinema or television screen that translate or transcribe the dialogue or narrative."
 Yes! I'm talking about them......Now, You should read this post willingly.


Procedure:

1. Open A Movie that you want to be viewed.
2. Now, on the Top Menu Click on Subtitles>Add a subtitle.
Adding a Subtitle in VLC Media Player
3. Now, Add a Subtitle File Having extension srt., sub. etc.
4. They would be displayed at the Bottom as default.
5. In this way, you can Download and add a subtitle to view a movie with your own Language..
6. Thanks, and don't forget to share the post...
Continue Reading >>

Thursday, 8 August 2013

How To Password Protect files and folders without using any Third party application in windows 7,vista,8,XP?

Today, i will show you another folder trick. This trick is very simple to Protect files and Folders without using any third type of application or software. This is done by using a notepad. You don, t need any software.
Sometimes you have to lock your folder and hide its files. You may use some softwares and other apps to done this, but in this tutorial you will learn to do this with out them. To done this, carefully read the content below...

Procedure for locking and protecting a folder:

  • Open Notepad.
  • Copy and paste the following text in opened notepad
 cls
@ECHO OFF
title Secret Locker ----------------------- os-trickz.blogspot.com
if EXIST "Control Panel.{21EC2020-3AEA-1069-A2DD-08002B30309D}" goto UNLOCK
if NOT EXIST Locker goto MDLocker
:CONFIRM
echo Do you want to hide this Locker, to keep it safe from univited eyes ? (Y/N)
set/p "cho=>"
if %cho%==Y goto LOCK
if %cho%==y goto LOCK
if %cho%==n goto END
if %cho%==N goto END
echo Invalid choice.
goto CONFIRM
:LOCK
ren Locker "Control Panel.{21EC2020-3AEA-1069-A2DD-08002B30309D}"
attrib +h +s "Control Panel.{21EC2020-3AEA-1069-A2DD-08002B30309D}"
echo Locker Secured !
goto End
:UNLOCK
echo Enter your secret password to unhide the Locker:
set/p "pass=>"
if NOT %pass%== 123456 goto FAIL
attrib -h -s "Control Panel.{21EC2020-3AEA-1069-A2DD-08002B30309D}"
ren "Control Panel.{21EC2020-3AEA-1069-A2DD-08002B30309D}" Locker
echo Locker visibility unlocked !
goto End
:FAIL
echo Invalid password
goto end
:MDLocker
md Locker
echo Locker created successfully :)
goto End
:End


change the highlighted text with your desired password.
  • Now, save it as xxx.bat file (xxx is the name of file). [see screenshot of this step]
  • Copy or move this file to any place where you want to create an folder having protection.
  • Open it. It will create an folder named Locker in that place.
  • Now, again open this xxx.bat file and type Y to lock this folder.
  • This will hide and lock your folder.

Procedure for Opening or un-locking folder:

  •  After locking/hiding a folder you should know about unlocking/un-hiding it.
  • Again open that xxx.bat file and type your password
  • This will un-hide that folder named locker and you can access the data.

Procedure for Disabling Protecting:

When you have un-locked the folder using above steps, Open that xxx.bat file and Type N instead of Y and folder will behave as a common folder.

Saving  xxx.bat file to a secure place:

You can save this xxx.bat file to any place. Then, to un-lock the folder you have to put that xxx.bat file to that location where you created the folder. In this way, you can manage and lock several folders by using only on xxx.bat file

Downloadable xxx.bat File:

If you cannot do this manually, I have also upload that .bat file and you can do this hack easily by download it by clicking here
    Continue Reading >>

    Wednesday, 7 August 2013

    How to Take A "Screen Shot" Of Your PC Screen Without using any Third Party Application or Software in Windows 7, 8, vista and XP ?

    In this post. You will learn to take a screenshot of your PC screen With out using any third party software. This might be very liked by you. This trick is very handy and mostly used thing for Every PC. We frequently overcome situation when we want To take a screen shot Of Your PC, specially for Bloggers it is a very nice trick. Do you want to know the original content of This post? Let, s begin.....
    Also check: How to Create an invisible folder having no Icon and Name in windows seven, Vista and XP?

    Procedure of Taking A screen shot of Your PC screen:

    1. To take a screen shot of your PC screen, You have to just Press a Button on your keyboard.
    2. The button is located at the top of right side arrows buttons As shown under.. 
    3. See the Screen shot
       
    4. By pressing this Button a screen shot is taken and is copied.
    5. You have to paste this copied screen shot of PC as picture Into some location i-e  paint or word.
    6. For this Open Paint/Microsoft word.
    7. To Open Paint. Go to start>all programs>accessories> Paint.
    8. Now, press Ctrl+V To paste your screenshot.
    9. Next step is to crop/cut a specific area of your Screen shot. To do this press Ctrl+Shift+X To select area for cropping and to make screen shot to look smoothly and professionally designed.
    10. Now, You can save your screen shot. To save it Press Ctrl+S, and then select location for saving.
    I hope this article was very helpful and very interesting. I hope that you enjoy my blog tutorials. Thanks for visiting.

      Continue Reading >>

      Wednesday, 31 July 2013

      How to Speed-UP the mouse cursor speed in Windows 7,Vista And XP

      Don,t get tired your fingers to move cursor continuously. You can speed up your Mouse-Cursor Speed in Windows 7, XP, and Vista by doing such small things. If you want to get relief from this tiredness and irritation. Then, simply do the following simple steps:

      Procedure:

      • Go to start>control panel.
      • Click on Hardware and sound.
      • Then, in the upper area of Devices and printers choose "Mouse"
         
      • A pop-up windows will appear, switch to Pointer Options tab.
      •  Now, increase the pointer Speed by scrolling under "select mouse pointer speed:"
      •  Click on apply as  shown in above figure
      • Enjoy :)
      Continue Reading >>

      Monday, 29 July 2013

      How to convert File Format Or Extension By just renaming it In Windows 7, Vista And XP?

      Converting files by just renaming may be very helpful and very handy. You have to just Rename its extension (e.g from .mp4 to .mp3). This is interesting ,By this you can covert files without using any converter. Remember, File is not fully converted by this method. Converting video files by this method can cause Playback problems. But it is helpful and It greatly works for some formats or extensions in most situations. One unique thing about this article is that you can open any file With Notepad by just renaming its extension from its original extension to .txt .This one is unique because it works without any error. Let, s see how to do it.
      Also check:Play all media files with windows media player

      Showing Hidden Extensions:

      By default setting of Windows the file extensions are not showing. So, you need to show them to use this trick smoothly. For this,
      • Open Windows Explorer, Click on Tools from Menu bar. If menu bar is n,t showing Press Alt Key  to show it Temporary.
      • Now, click on Folder Options. (see screen shot)
         
      • After this Switch to View tab.
      • Just un-tick the "hide extension for known file types". (see screen shot)
      • Now, Click on Apply.

      Process of Renaming and Converting:

      1. After Doing above steps, The extensions of files will be shown.
      2. Next step is to Convert it by just renaming.
      3. For this Select the file and press F2 to rename it.
      4. Now, Just replace the Original extension to your desire extension.
      5. It will display a message Click on Yes(See screenshot [step 1 to 4])
        Enjoy :)
      Please like us and comment if you have any type of problem. Have a nice day.
      Continue Reading >>

      Friday, 26 July 2013

      Don, t Move files to recycle bin | Disable Delete Confirmation dialogue:

      I this tutorial I, will show you a very simple but helpful trick. I, ll show you how to configure recycle bin to "don, t move files to it" and also to "disable delete confirmation dialog". let, s see how to do this.

      Don, t move files to recycle bin:

      • For this just right-click on Recycle bin.

      • Then, navigate to properties.
      • Select your drive for which you want to configure.
      • Then, check on "Don, t move files to recycle bin". 


      •  Then, click on 'Apply'.

      Disable delete Confirmation dialogue:

      • Right-click on recycle bin.
      • Navigate to 'properties'
      • Just UN-check the "display delete confirmation dialogue" as shown in below figure.
      • Click on apply. 

      Keyboard Shortcut to do this:

      You can also use Shift button to do this. Holding Shift button during deleting prompt file not to be moved to Recycle bin.
      Continue Reading >>

      Thursday, 25 July 2013

      How to Play all type of media files with Windows Media Player by installing Codec

      Windows media player has its own value and importance in Microsoft Windows (OS). If you will learn that "how to play all type of video and music files with Windows media player" then I can surely say that it will be your favorite and best media player.All type of other universal media player like VLC, KM player etc are only load for a PC. The only media player that runs smoothly is Windows media player Provided by Microsoft. I will teach you a way to play all type of media files with only a single Windows media player.
      Also Check: How to add "Open with Notepad" In the right click menu of the file?
      Process:  
      • The process of installation is so simple and easy.
      • You have to download a Codec pack named as K-Lite Codec Pack.
      •  Install this Pack.
      • After installing this Your Windows media Player will play all media files with all its features.
      • You can download this Codec Package by following link.
      Download Links:
      Download K-lite Codec pack.
      Continue Reading >>

      Wednesday, 24 July 2013

      How to delete an undelete able or stubborn file by using unlocker?

      Today I will show you a way to delete an undelete able or a stubborn file by using unlocker. This is software created to kill processes running by file which prevent that file to be deleted. By using this you can freely delete a stubborn or undelete able file.
      Process to delete files with unlocker:
      • Just install the software.
      • If you have a file that is undelete able and you want to delete it just right-click it and choose unlocker.
      • Then click on kill processes.
      • Then, try to delete. This time the file will be deleted.

      Download links:
      Continue Reading >>

      Tuesday, 23 July 2013

      How to use A Flash drive-USB or pen drive As A RAM in Windows XP,Vista And 7


      In this post we tell you guys how to use a flash drive or pen drive as a RAM for WIN7, VISTA and XP. So let’s begin. Increasing the PC’s RAM using USB Flash Drive will help also enhance Game performance and decrease the time of execution of some tasks made by software.

      A) For WIN7/VISTA

      1. Insert your pen drive and then format it.

      2. Right click on your pen drive and then click on properties.

      3. Now navigate to Ready Boost tab, click on it and then Use this device. (Right click on the drive -> Properties -> Ready Boost-> Use this device)

      4. Choose maximum space or better choose around 80% of USB Drive’s size.

      5) Click on Ok tab and then restart your computer for the changes to take effect.

      NOTE:

      NEVER pull USB flash drive out of USB Port while it is being used as a Ready Boost device. Do NOT save any data files on the FLASH/USB drive when it is being used as Ready Boost device.

      Now you are all set to use your computer with increased RAM

      B) For Windows XP

      1) Firstly, insert your Flash Drive.

      2) Right Click on Computer > Properties

      3) Now click on advanced tab and then click on performance

      4) Now click on advanced and then click on the virtual memory tab.

      5) Then select your flash drive and click custom size

      6) Now view the memory available in your flash drive and enter the same in the Initial and the Max columns.

      7) Click on ok and then restart your computer for the effects to take place.

      That’s it. You have converted your USB flash drive into RAM. Now you can access your computer with increased RAM and higher speed
      Continue Reading >>

      How to Select Multiple Files In Microsoft Windows-You should know

      There are several ways to select multiple files or folders.
      1. Open the folder that contains the files or folders you want to select.
      2. Select the files or folders using any one of these methods:
        • To select a consecutive group of files or folders, click the first item, hold down the SHIFT key, and then click the last item.
        • To select a consecutive group of files or folders without using the keyboard, drag the mouse pointer to create a selection around the outside of all the items you want to include.
        • To select nonconsecutive files or folders, hold down CTRL, and then click each item you want to select.
        • To select all of the files or folders, on the toolbar, click Organize, and then click Select All.
      To cancel the selection of individual items within a selected group, hold down CTRL, and then click the items that you don't want to include.
      Continue Reading >>

      Saturday, 13 July 2013

      Flux - Software For Your Eye Protection - Your Eyes Will say Thank You

      F.lux is a small genius bit of software which changes the color of your screen from natural looking to artificial looking during the right hours, in order to help you sleep better. F.lux even helps you get the exact settings for your location in the world!
      Features
      1.It makes the color of your computer's display adapt to the time of day, warm at night and like sunlight during the day.
      2.It's even possible that you're staying up too late because of your computer. You could use f.lux because it makes you sleep better, or you could just use it just because it makes your computer look better.
      3.f.lux makes your computer screen look like the room you're in, all the time. When the sun sets, it makes your computer look like your indoor lights. In the morning, it makes things look like sunlight again.

      Note:You can change the settings by going to Change Settings  or Go to official home page of F.lux.
      Then, Share your location and it will adjust your screen color according to the time of day
      Enjoy the fun...

      Continue Reading >>

      Sunday, 7 July 2013

      How to Add "Open With Notepad" Option to the Right-click/Context Menu Of Any File:

      This process will add an extra option "Open with notepad" to context menu or simply right click of mouse for a selected item. Before doing so you should make a back of your registry.
      Now,  Open your notepad or any other text editor enter the following Information:-


      Windows Registry Editor Version 5.00
      [HKEY_CLASSES_ROOT\*\shell\Open with Notepad]
      [HKEY_CLASSES_ROOT\*\shell\Open with Notepad\command]
      @="notepad.exe %1"

      Note:
      Please make sure that the first line (the one starting with "Windows Registry Editor..." appears in the text file. Now save the notepad file anywhere on your computer and give it a .reg extension.(suppose xxx.reg).Now you need to install that registry file to Windows registry..
      After installing the registry Now reboot your computer and Enjoy the change.

      Downloadable Registry hack:

      If you cannot do this manually ,I have also made and uploaded it Just download it and Open it.
      Continue Reading >>

      How to Customize or Change the Power button Action in Windows 7 Start menu to shutdown, Switch User, Log off, Lock, Restart, Sleep or hybernate?

      We can change the Power button Action according to our requirement in Windows Seven Start menu As
      Shut Down Switch User,Log Off,Lock,Restart,Sleep and Hybernate

      Process to change Power buton Action:

      1. Right-Click of mouse on an empy space of taskbar and Choose "properties"
      2. On the "taskbar and start menu properties" window , Navigate to "Start Menu" tab.
      3. On the "Power button Action" Choose the desired action from the drop down list.

      4. Now "apply" the changes and click on "ok".
      5. Now click on start button and see the changes.
      Continue Reading >>

      Download group policy editor for Starter,home basic and Premium version of Windows Seven and Vista?

      In some version of Windows Seven and vista (Home basic, Home premium and starter edition) we don't find the Group policy Editor option. But in the ultimate, professional and Enterprise Edition, Group policy editor is there.

      Also see: How to open Group policy Editor and registry Explorer

      Here we are using a 3rd party application to do the same.To enable the Group policy editor for home basic, home premium and starter edition just download the zip file and Extract it using Winzip or any other Zip file Extracter.


      Download Link
      : Click Here To Download
      Note:If You have any problem with link Just tell me by dropping your comment.
      Continue Reading >>

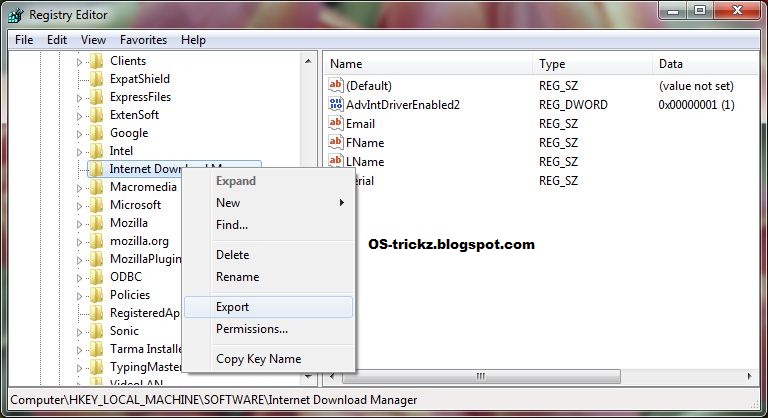
      How to Make back up Only a single Registry key or DWORD value?

       1. Open Registry Editor.
      Also check: How to  Open Registry and Group Policy editor.
      2. Navigate to the key that you want to save or create a back up for that.
      3. Now Right click on that key.

      Also see: How to add restart explorer to context menu of desktop?

      4. Now click on Export.

      5. Now open the desired location where you want to save the registry file and give a name to that registry.
      6. That is it. Now open that location you will find a back up of your registry. (i.e. the file with .reg extension)
      Continue Reading >>

      Saturday, 6 July 2013

      Keyboard Shorcut Keys For Microsoft Windows XP,Vista And 7:

      KeyBoard Shorcut Keys for Microsoft Windows:

      F8 (during boot)                                Holding F8 when booting displays the Windows Boot Menu
      SHIFT (during boot)                          Holding SHIFT down when booting forces Windows into Safe Mode
      CTRL + ALT + DEL                          Displays the Task Manager or Windows Security dialog box
      ALT + TAB                                        Static rotate forward between currently open applications
      ALT + SHIFT + TAB                         Static rotate backward between currently open applications
      WINDOWS KEY + TAB                   Live view rotate forward between currently open applications
      WINDOWS KEY + SHIFT + TAB    Live view rotate backward between currently open applications
                                                                 Rotates through currently open applications in the order they were started

      ALT + PRINT SCREEN           Sends a screen shot of the current application to the Windows clipboard
      CTRL + ESC                            Displays the Windows Start Menu (same as with the Windows Key)
      CTRL + + (on numeric keypad)       Resize column to size of longest item in Windows Explorer details view
      SHIFT + *              Opens folder currently selected in Windows Explorer and all sub-folders
      F1                           Displays the Help window for the current application
      F2                           Renames currently highlighted object
      F3                           Displays the Windows Search dialogue
      F4                           Positions cursor at the Address Bar in Windows & Internet Explorer
      F5                           Refreshes contents in Windows & Internet Explorer
      ALT + F4                     Closes current application
      CTRL + F4                   Closes currently open window in current application
      CTRL + Z                     Reverses last made change(s) in current document or field
      ALT + ENTER              Opens the properties dialogue for the currently highlighted object
      SHIFT + f10                  Displays the context menu (same as with the Application Key or right mouse click
      SHIFT + DEL                Deletes objects directly, does not send them to the Recycle Bin
      SHIFT (inserting CD/DVD)     Holding SHIFT when inserting a CD or DVD prevents auto-play
      SHIFT (selecting objects)        Holding SHIFT down while selecting objects selects objects inclusively
      CTRL (selecting objects)         Holding CTRL down while selecting objects selects objects individually
      WINDOWS KEY + D           Minimizes all open windows and displays the desktop (using this combination again restores all minimized windows)
      WINDOWS KEY + TAB           Cycles through open applications via the taskbar
      WINDOWS KEY + E             Starts Windows Explorer to browse local computer
      WINDOWS KEY +               Displays the Windows Search dialogue
      WINDOWS KEY + CTRL + F      Displays the Windows Search for Computers dialogue
      WINDOWS KEY + F1            Displays the Microsoft Windows Help window
      WINDOWS KEY + L              Locks the computer
      WINDOWS KEY + M             Minimizes all open windows
      WINDOWS KEY + SHIFT + M     Restores all windows minimized using WINDOWS KEY + M
      WINDOWS KEY + R             Displays the Run dialogue window
      WINDOWS KEY + U             Displays the Windows Utility Manager
      WINDOWS KEY + PAUSE    Displays the Windows System Properties dialogue


      SHORTCUT KEYS APPLICABLE FOR MOST WINDOWS APPLICATION
      F1                                    Displays the current application’s Help window
      CTRL + A                       Selects all text in current document
      CTRL + B                       BOLD highlighted text
      CTRL + I                        ITALICIZE highlighted text
      CTRL + U                      UNDERLINE highlighted text
      CTRL + X                      Cuts (deletes) all highlighted text
      CTRL + C                      Copies all highlighted text to the Windows clipboard
      CTRL + V                      Pastes contents of Windows clipboard into current document at cursor position     CTRL + K                      Insert hyperlink
      CTRL + P                      Displays the print dialogue
      CTRL + Z                      Undo last action
      CTRL + Y                      Repeat last action
      ALT + E                         Opens the EDIT menu in the current application
      ALT + F                         Opens the FILE menu in the current application
      SHIFT + INS                 Pastes contents of Windows clipboard into current document
      HOME                           Positions cursor at beginning of current line
      CTRL + HOME             Positions cursor at beginning of current document
      END                              Positions cursor at end of current line
      CTRL + END                Positions cursor at end of current document
      SHIFT + HOME            Selects all text from current position to beginning of current line
      SHIFT + END                Selects all text from current position to end of current line
      CTRL + LEFT ARROW         Moves cursor to the left one word at a time
      CTRL + RIGHT ARROW       Moves cursor to the right one word at a time
      Continue Reading >>

      How to Create an invisible folder having no Icon and Name in windows seven, Vista and XP?


      This process will make a folder invisible. So that no one will be able to see that folder. But in thumbnail view of folder the location of the folder is view able.
       Process to make a folder Invisible1. First create a folder or make a folder with a blank space or without any name.

      First Check: How to create a folder with no name or with a blank space
      2. Now a folder without any name will be created.
      3. Now you have to change the icon of the folder so that the folder will be invisible.
      4. Now righ click on the folder and choose "Properties".
      5. On the propeety window navigate to "customize" tab.
      6. Now click on "Change Icon".
      7. Now the icon selection window will be opened.
      8. Now move the scroller and choose the empty icon as shown in the figure.
      [Figure for step 2 to 8]

      Continue Reading >>

      How to convert A .nrg image file or a CD/DVD Or a Folder to To .ISO image File by Using Any To ISO?

      To convert anything (It may be a .nrg or any other image file or A cd/dvd or any folder) to .iso image file. We need a software named as "AnyToIso" .Any To Iso is the minimum required software to do so.


      Also See: Any to ISO with serial key free download full version

      To convert just follow the steps:
         1. Download and install the software.
         2. There you will find the three option on a tabbed view.
             a) File Extract/Convert to Iso
             b) CD/DVD disk to Iso
             c) Folder To Iso

         3. In "File Extract/Convert to Iso" we will able to convert any image file to the .iso image file. We can also extract the image file data to a folder.
         4. In "CD/DVD disk to Iso" we will able to make a iso image file from the datas of the CD or DVD.
         5. In "Folder to iso" we will able to make a iso image from the content of the folder.

      Continue Reading >>

      Search This Blog