Friday 30 August 2013

How to Resume Broken Downloads in Internet Download Manger (IDM)?

Hi my lovely Readers, I am again here to show you another Internet download manager trick to help you. Internet download manager is one of the most popular softwares. It gives you many advantages. Its features are awesome that make it superior to all other Download Managers. Now, I am writing one of its great feature. About 50% downloads are slow and they cannot resume in a regular manner. The reason of breaking of links and downloads is that Links are updated regularly after some time, As a result when we try to resume download with the previous link, the link has been broken as they are changed by the server providers and we are unable to resume the download. But Don, t worry you can resume 99.99% downloads by this trick. Care fully read and follow the steps...

How to resume downlaod?

If you know that a site from which you are downloading does not provide Resume-able links and Downloading of file has been stopped due to disconnection from internet/server. To resume that download at this position do the following...
  1. Click on IDM icon on System tray to open the IDM main window.
  2. Now, the next step is to find the download which is stopped and you want to resume it.
  3. Right-Click on that download and click on Refresh download address. In this tutorial i, ll take an example of nowdownload for easy learning. [see screenshot of this step below]
    How to Resume Broken Downloads in Internet Download Manger (IDM)?
  4. Now, It will pop-up a new windows saying that "IDM will open a web page in your browser where it captured this download............" like this..   [see screenshot] 
    How to Resume Broken Downloads in Internet Download Manger (IDM)?
  5. Click O.K  and it will open a web page with its own windows like this...
    How to Resume Broken Downloads in Internet Download Manger (IDM)?
  6. Click on Link from which you have Downloaded the file.. [see screenshot]
    How to Resume Broken Downloads in Internet Download Manger (IDM)?
  7. Now, it will inform you by that , "New link address for this site was received successfully" like below..
    How to Resume Broken Downloads in Internet Download Manger (IDM)?
  8. Now, again open IDM main window by clicking on IDM icon on system tray.
  9. Right-Click on Download and then click on Resume Download [see screen shot]
    How to Resume Broken Downloads in Internet Download Manger (IDM)?
It will automatically Resume the download from exact position where the download was stopped.
In this way, you can resume many of  your broken downloads instead of re-downloading it from beginning. Enjoy ! and don, t forget to say thanks...
Continue Reading >>

Tuesday 27 August 2013

How to Block Ads in Internet Explorer 10 (IE), Firefox and Chrome?

How to block ads on Internet explorer 10, Firefox and Chrome
Hi, all. Every one using internet should Know this "How to block ads". I had decided to publish a post regarding with blocking ads to help you. About 97% of websites are using and Displaying advertisements on Their site including facebook, Google, Youtube and many others. Some Ads attract us to SEX and Nudity. Doing and Watching Fornication (Zana) is Strictly Prohibited in Islam. It is one of the Biggest sins mentioned in Quran. May Allah Forgive us and Save us From Evils and from Hell.
I especially wrote these above four lines Not only for my Friends, not only for Muslims, These Orders,Sayings and Enjoinments are for All The Humans in The world whether He/She is 18+ or a kid. I specially wrote these lines because I, m not blogging or writing posts for myself , My Aim of blogging and writing posts is to spread knowledge to everyone to help Human Beings. And Inshaa-Allah I will continue it.

How to block ads on IE, Firefox and Chrome?

Internet Explorer:

I Put Internet Explorer (IE) Ar first because This is rarely Known to users. Recently, Adblockplus.org introduced Adblocker For internet Explorer. Before it, Blocking ads on IE was a bit complicated but know you can easily do this.....

  1. Open IE and Go to this Link http://adblockplus.org/en/internet-explorer Then, Click on Install for IE
  2. After Downloading the Addon exit IE and Install it.
  3. Now, Open IE and at the bottom it will ask you to enable or disable the installed addon, click Enable
  4. Now, You can block ads On IE but in Firefox and Chrome Adblocker is More Advance and It is better than that of IE.

Firefox:

Firefox is my default and my favorite browser. It is a product of Mozilla. No doubt, Chrome beats Firefox in Speed but speed is Not enough for a good browser, there are many bugs in chrome that makes Firefox superior to it and they cannot be listed right now, Only superusers can imagine the importance of Firefox. Actually, the Adblocker was firstly introduced to Firefox for first time, Later on Google chrome made it for itself. Adblockplus.org and Mozilla Foundation communities are doing well job to make the Web and browsing easy, clean from any annoyance and fast. To block ads on Firefox do the following...

  1. Open Firefox and go to this link https://addons.mozilla.org/en-US/firefox/addon/adblock-plus/?src=hp-dl-mostpopular
  2. Now, Click on Add to Firefox
  3. It will automatically download and install the addon.
  4. After installation, No more ads will be displayed on Firefox.

Google chrome:

Google Community is The Biggest community in the world of Internet. It is facilitating the web, I, m thankful to Google Community by which I can publish my posts. One of the best products of Google Community is Chrome which is the fastest browser. To block ads on Google Chrome Do the Following.
  1. Open Chrome and Go to this Link https://chrome.google.com/webstore/detail/adblock-plus/cfhdojbkjhnklbpkdaibdccddilifddb?utm_campaign=en&utm_source=en-et-na-us-oc-webstrext&utm_medium=et
  2. Click on Add to Chrome.
  3. It will automatically download and install the extension.
  4. After Installation, No more ads will be displayed on your browser
Continue Reading >>

Sunday 25 August 2013

EA Sports Cricket 07 Free Download PC Game Full

Brief Description:

New Cameras: Innovative views from behind the batsman offer a realistic batting perspective, and a reworked Broadcast camera gives you a wider view of the play for more authentic coverage.
Quickplay Cricket: Play cricket your way by setting your own pace. Crank up the game speed, ease back the difficulty setting and revel in the razzmatazz of Limited Overs or fully-licensed Twenty20 extravaganzas by playing a fast-blast match of hard-hitting sixes or slow the pace down, slide the difficulty up and steel yourself for a five day Test.
Greater Depth: A new picture-in-picture display with a shot timing gauge coupled with a running assistance indicator and radar help you make those snap decisions out there in the middle. On-the-fly Dynamic Field Positioning and Quickswitch bowling give you the ability to ratchet up the pressure on the batsmen by changing the field and the bowler's line of attack without a break in play.
Groundbreaking Control: Use the intuitive dual analogue Century Stick batting system to select foot choice, shot direction, power and timing. With button controls to loft shots and advance down the track, you're free to crack a full array of shots all around the wicket. Success with the bat also relies upon your batsman's individual skills, allied with his confidence level. A confident batsman maximises his potential to time his shots sweetly maintaining high confidence can make or break his ability to build a big innings.
Tournament Options: Lead this year's eagerly anticipated 3 mobile Ashes campaign Down Under, replay the legendary 2005 npower Test Series or unlock a stack of rewards by accomplishing Ashes challenges. Take part in the frenzy of the fully-loaded, fully-licensed English and Australian One Day blitz of extreme Twenty20 cricket, dive into a complete schedule of Australian State and English County tournaments, tour the world, win the World championship or compete for glory in Test matches and One Day Series games with all the top cricketing nations of the world.

Minimum PC-Requirements:

Processor: 1 GHz
RAM: 256 MB
Video Memory: 32 MB
Only supplied on DVD?: Yes
Hard Drive Space: 1.2 GB
Operating System: Windows 2000 / Windows XP / Windows 7 /Windows 8
DirectX Version: 9.0 or Higher

Download Links:

Download EA Cricket 07


Continue Reading >>

Fully Customize Jump Break in Blogger

The people using jump break Should know these hacks/Customization to enhance their blog beauty and performance. I will show you how to Display blogger Jump Break Post Page Link Text, Display it on Right/Left, Hide Jump break, Increase Text size, Change font...... You Should backup your template first. To do customizations Read the Post Carefully.
Also check: How to add Auto-Read More Hack/Option in Blogger

Customizing Blogger Jump break:

Change Post Page Link Text:

By Default Post page link text is Read More. You can change it by doing as follows..

1. Go to Blogger>Layout.
2. In the Blog Posts section, Click on Edit. [see screenshot of this step]
3.  It will pop-up a new Window Replace Read More with Your Desired text (e.g Continue Reading, Read full etc) [see screen shot of this step]
4.Save and exit.

Display Jump break Link On Right/Left:

By default Post page link is Displaying on Left which may annoy a blogger user. To Display it on Right add the following CSS code.

1.Go to Blogger>Template.
2.Click on Edit Template.
3.Press Ctrl+F to find the Following Code:
]]></b:skin>
4.Now, add the following code before/above it: [see screenshot of this step]

.jump-link { float: right; }


5. Save Your Template.

Hide Jump Break Link:

Hiding a jump link may be helpful. Because The full post page can also be viewed by clicking on Post title link which is displayed at the starting point of a post. To hide it do the following.
1.Go to Blogger>Template.
2.Click on Edit Template.
3.Press Ctrl+F to find the Following Code:
]]></b:skin>
4.Now, add the following code before/above it: [see screenshot of this step]
.jump-link { display:none; }

5.Save your template.

Change font size and Style:

1.Go to Blogger>Template.
2.Click on Edit Template.
3.Press Ctrl+F to find the Following Code:
]]></b:skin>
4.To increase font size and style, add the following code before/above it:  [see screenshot of this step]
.jump-link a, .jump-link a:visited {
font-size:15px;
font-family: "Georgia";
font-wei.pagenavi{
clear:both;margin:10px auto;text-align:center
}
5. Save Your Template and Enjoy. :)

Continue Reading >>

Thursday 22 August 2013

GTA San Andreas [Highly Compressed] PC Game Full Highly Compressed Free Download

GTA San Andreas [Highly Compressed] PC Game Full Highly Compressed Free Download

Brief Description:

Grand Theft Auto: San Andreas is a 2004 open world action-adventure video game developed by Rockstar North in the United Kingdom and published by Rockstar Games. It is the third 3D game in the Grand Theft Auto video game franchise, the fifth original console release and eighth game overall.
San Andreas is structured similarly to the previous two games in the series. The core gameplay consists of elements of a third-person shooter and a driving game, affording the player a large, open world environment in which to move around. On foot, the player's character is capable of walking, eating, running, sprinting, swimming, climbing (the first GTA game in which swimming and climbing are possible) and jumping as well as using weapons and various forms of hand to hand combat. Players can drive a variety of vehicles, including automobiles, buses, semis, boats, fixed wing aircraft, helicopters, trains, tanks, motorcycles and bikes. Players may also import vehicles rather than steal them.

Recommended System Requirements:

Intel Pentuim 4 or AMD XP Processor (or better)
384MB RAM
16x Speed DVD Drive
4.7GB Hard Drive Space
128MB Video Card

Download links:

Continue Reading >>

Spiderman 2 PC Game free Download

Brief description:

Recently, I decided to Give you some Games for some enjoyment. Spiderman 2 is movie based game developed by Activision studio. The plot of the PC game differs drastically from the main console versions. It first starts out with a short cutscene from the primary console game that introduces as to how Dr. Otto Octavius became Doc Ock with his fusion reaction experiment. The PC version then diverges from the console versions with a tutorial, (narrated by Bruce Campbell) telling the player how to play as Spider-Man, (i.e. web swinging, wall crawling, fighting, etc.).

PC Requirements:

CPU: Pentium or Athlon 600 MHz Processor
RAM: 128MB RAM
VGA: 16MB DirectX compatible 3D Accelerated Video Card
OS: Windows 98/ME/2000/XP/Windows 7
HDD (hard disk driver): 827MB Hard Disk Space
ODD (optical disk drive): 4X CD-ROM Drive

Download Links:

Download Password=os-trickz.blogspot.com
RAR Password=www.muhammadniaz.net
Continue Reading >>

Wednesday 21 August 2013

Windows 7 Genuine Activator Free Download for All versions

Windows 7 Genuine Activator free Download
Hi, all. I my previous post. I have discussed about RWAT which was used to remove Windows Activation technology by an hacking process.But this time we will learn to make Windows 7 activate permanently by its Genuine Activator to pass Microsoft genuine check validation. You can download it by following link.
Also check:Windows 8 genuine activator

Procedure:

1.Download Windows loader v2.1.2 by following link.
2.Open windows loader.exe
3.Click install.
4.Wait for sometime....
5.It will inform you that your windows is fully licensed and activated.
6.Restart Your PC and enjoy.

Download links:

Continue Reading >>

Monday 19 August 2013

Show or Hide Computer, Recycle Bin, User's files, Control Panel & Network on Desktop

Some people do not think about this trick. This is not a trick it is just a customization in a geeky way. You may not know about this that you can show may of the common places on Your Desktop. The process is so simple, Just follow me...

Procedure:


Continue Reading >>

Sunday 18 August 2013

Avast professional,internet security, free and all other versions License pack free download 2013

Avast license pack free download:

This package contains all those licenses from which you can activate the latest avast 2013. You can download it by following link..

Download avast license pack


Continue Reading >>

Thursday 15 August 2013

What are Add-ons/Extensions and How to install Add-ons/extensions Offline in Firefox and Google Chrome?

About:

Everyone using these heavy Browsers (Firefox and Chrome) Should know about their add-ons/extensions.
Add-ons are small pieces of software that add new features or functionality to your installation of Firefox/Chrome. Add-ons can augment Firefox/Chrome with new features, foreign language dictionaries, or change its visual appearance. Through add-ons, you can customize Firefox/Chrome to meet your needs and tastes.

Official websites for installing Add-ons and other types of Apps:

You can Install Add-ons in Firefox from https://addons.mozilla.org and for Google Chrome You can install extensions from https://chrome.google.com/webstore

How to install extensions Offline In Firefox And Google Chrome:

 You have to download that Add-on/extension manually (You must have IDM or other Download manager) to save it in your computer. For this...
  • Go to Download/install page of Addon.
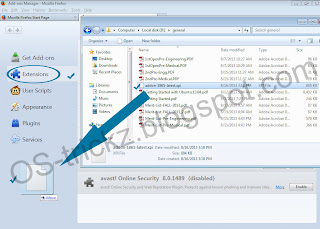
  • Right-click on Add to Firefox/Chrome and then Click on Download with IDM. [see screen shot of this step]
  • Now, IDM will download that add-on/extension.
  • Open folder in which you have downloaded the file.
  • Now, Open Firefox/Chrome.
  • If you are using Firefox Press Ctrl+shift+A and if you a chrome user then Click on upper-right button>Tools>Extensions to view the extensions/add-ons window.
  • Now, Drag and drop that Extension in the Opened Window of Firefox/Chrome. [see screen shot of this step for firefox] [see screen shot for Chrome]
  • Click install and enjoy the fun!
Continue Reading >>

Wednesday 14 August 2013

How to Disable User Account Control (UAC) in Windows 7 and 8?-Disable UAC Prompt screen/message

This will disable the UAC confirmation message that pop-ups when a program or application wants to make changes with your PC/Windows. Some people may found irritation and may be annoyed by this message and want to disable this message. This feature is only available in Windows 7 or 8 Users.
The process is so simple. To do this do the following..

Procedure for Disabling UAC in Windows 7 and 8:

    1. Go to Start and search for UAC [see screen shot of this step]
    2. Click on Change User Account Control Settings.
    3. It will pop-up a new window, Set its value to Never notify and then click OK [see screen shot of this step]
    4. Then, click OK on UAC prompt screen .
    5. Restart Your PC.
    6. Now, you have gotten rid of that UAC prompt screen/message
      Continue Reading >>

      Tuesday 13 August 2013

      Add Beautiful sliding Share Buttons Widget under Each Post Manually in Your Blog Only by OS-trickz

      Sharing buttons are important part of any blog. They help greatly in spreading A Blog content and also to increase the blog visitors. The default buttons provided by blogger not fulfill the requirements As, it provides only Small set of Social media buttons. Now, i, m sharing a good set of beautiful sliding social media buttons which help in Sharing a post.

      Procedure for adding Sharing buttons:

      1.Go to Blogger Dashboard Home>Template>Edit Template.
      2.Click any where in Template section and press Ctrl+F to find the following code:

      <b:if cond='data:post.hasJumpLink'>

      3.After Find this code add the following code just above it.

      <b:if cond='data:blog.pageType == &quot;item&quot;'>   <div class='sharelordhtml'> <center><div class='headinglordhtml'>Like the Post? Do share with your Friends.</div>     <ul class='social' id='cssanimation'>     <li class='facebook'>     <a expr:href='&quot;http://www.facebook.com/share.php?v=4&amp;src=bm&amp;u=&quot; + data:post.url + &quot;&amp;t=&quot; + data:post.title ' onclick='window.open(this.href,&apos;sharer&apos;,&apos;toolbar=0,status=0,width=626,height=436&apos;); return false;' rel='nofollow'><strong>Facebook</strong></a>     </li>     <li class='twitter'>     <a expr:href='&quot;http://twitter.com/home?status=&quot; + data:post.title + &quot; -- &quot; + data:post.url ' rel='nofollow' target='_blank'><strong>Twitter</strong></a>     </li>     <li class='googleplus'> <a expr:href='&quot;https://plusone.google.com/_/+1/confirm?hl=en&amp;url=&quot; + data:post.url' onclick='window.open(this.href,&apos;sharer&apos;,&apos;toolbar=0,status=0,width=626,height=436&apos;); return false;' rel='nofollow' target='_blank'><strong>Google+</strong></a>     </li>     <li class='pinterest'> <a href='javascript:void((function()%7Bvar%20e=document.createElement(&apos;script&apos;);e.setAttribute(&apos;type&apos;,&apos;text/javascript&apos;);e.setAttribute(&apos;charset&apos;,&apos;UTF-8&apos;);e.setAttribute(&apos;src&apos;,&apos;http://assets.pinterest.com/js/pinmarklet.js?r=&apos;+Math.random()*99999999);document.body.appendChild(e)%7D)());' rel='nofollow' target='_blank'><strong>Pinterest</strong></a>     </li>     <li class='stumbleupon'>     <a expr:href='&quot;http://www.stumbleupon.com/submit?url=&quot; + data:post.url + &quot;&amp;title=&quot; + data:post.title ' rel='nofollow' target='_blank'><strong>StumbleUpon</strong></a>     </li>     <li class='delicious'>     <a expr:href='&quot;http://delicious.com/post?url=&quot; + data:post.url + &quot;&amp;title=&quot; + data:post.title ' rel='nofollow' target='_blank'><strong>Delicious</strong></a>     </li>     <li class='linkedin'>     <a expr:href='&quot;http://www.linkedin.com/shareArticle?mini=true&amp;url=&quot; + data:post.url + &quot;&amp;title=&quot; + data:post.title + &quot;&amp;summary=&amp;source=&quot;' rel='nofollow' target='_blank'><strong>LinkedIn</strong></a>     </li>     <li class='reddit'>     <a expr:href='&quot;http://reddit.com/submit?url=&quot; + data:post.url + &quot;&amp;title=&quot; + data:post.title ' rel='nofollow'><strong>Reddit</strong></a>     </li>     <li class='technorati'>     <a expr:href='&quot;http://technorati.com/faves?add=&quot; + data:post.url ' rel='nofollow' target='_blank'><strong>Technorati</strong></a>     </li>     </ul></center></div>   <link href='http://fonts.googleapis.com/css?family=Englebert' rel='stylesheet' type='text/css'/>&#8203; <style> ul.social { list-style:none; display:inline-block; margin:15px auto; }  ul.social li { display:inline; float:left; background-repeat:no-repeat; }  ul.social li a { display:block; width:50px; height:50px; padding-right:10px; position:relative; text-decoration:none; }  ul.social li a strong { font-weight:400; position:absolute; left:20px; top:-1px; color:#fff; z-index:9999; text-shadow:1px 1px 0 rgba(0,0,0,0.75); background-color:rgba(0,0,0,0.7); -moz-border-radius:3px; -moz-box-shadow:0 0 5px rgba(0,0,0,0.5); -webkit-border-radius:3px; -webkit-box-shadow:0 0 5px rgba(0,0,0,0.5); border-radius:3px; box-shadow:0 0 5px rgba(0,0,0,0.5); padding:3px; }  ul.social li.facebook { background-image:url(http://4.bp.blogspot.com/-lZU1EYD1F8I/USLDr4fq_WI/AAAAAAAADZ8/LZwiuSZX54Q/s000/facebook.png); }  ul.social li.twitter { background-image:url(http://4.bp.blogspot.com/-6LkWNWPZY34/USLDsObproI/AAAAAAAADaE/4guHCvwJKi4/s000/twitter.png); }  ul.social li.googleplus { background-image:url(http://4.bp.blogspot.com/-fZfd39sChNU/USLDstFlL5I/AAAAAAAADaM/Sg5VAo2Ow3Q/s000/google%252525252b.png); }  ul li.pinterest { background-image: url(http://2.bp.blogspot.com/-72i4ApQnggw/USLDs4L7COI/AAAAAAAADaU/JMFGHyVr85g/s000/pinterest.png); }  ul.social li.stumbleupon { background-image:url(http://4.bp.blogspot.com/-pIU1mr5wP_s/USLDtZiz65I/AAAAAAAADac/5vfi00-HALk/s000/stumbleupon.png); }  ul.social li.delicious { background-image:url(http://1.bp.blogspot.com/-GA3bNalDvUY/USLDtoZcCXI/AAAAAAAADak/p0qElAZt3H4/s000/delicious.png); }  ul.social li.linkedin { background-image:url(http://4.bp.blogspot.com/-IrAPai30QOk/USLDuC4TZYI/AAAAAAAADas/ed2dUgvjGsc/s000/linkedin.png); }  ul.social li.reddit { background-image:url(http://4.bp.blogspot.com/-8cvndGGioNw/USLDuXeExQI/AAAAAAAADa0/vYk92G_FE_Q/s000/reddit.png); }  ul.social li.technorati { background-image:url(http://2.bp.blogspot.com/--s8tQg0YLkU/USLDujnZ7AI/AAAAAAAADa8/BifKLMfV4IY/s000/tbi-technorati.png); }  #cssanimation:hover li { opacity:0.2; }  #cssanimation li { -webkit-transition-property:opacity; -webkit-transition-duration:500ms; -moz-transition-property:opacity; -moz-transition-duration:500ms; }  #cssanimation li a strong { opacity:0; -webkit-transition-property:opacity, top; -webkit-transition-duration:300ms; -moz-transition-property:opacity, top; -moz-transition-duration:300ms; }  #cssanimation li:hover { opacity:1; }  #cssanimation li:hover a strong { opacity:1; top:-10px; } .headinglordhtml{     font-size:25px;     font-family: &#39;Englebert&#39;, sans-serif; } .sharelordhtml{   border-top:30px solid #3873CC;      padding:16px;         -webkit-box-shadow: 0px 7px 9px rgba(50, 50, 50, 0.75); -moz-box-shadow:    0px 7px 9px rgba(50, 50, 50, 0.75); box-shadow:         0px 7px 9px rgba(50, 50, 50, 0.75);     transition: background .777s; -webkit-transition: background .777s; -moz-transition:background .777s; -o-transition: background .777s; -ms-transition: background .777s;     background:#D9D6FF; }  .sharelordhtml:hover {         background:white;  }  &#8203; </style>  </b:if>

      4.Now, Save Your Template and enjoy.
      Continue Reading >>

      Monday 12 August 2013

      "Go to Top" and "Go to Bottom" Keyboard Shorcut keys for Firefox, Google Chrome And IE?

      Hi, all. Everyone browsing Internet Use one of the famous browsers like Firefox, Chrome And IE. While Browsing web You may get tired while scrolling a big page from going top to bottom or from bottom. This would be helpful for you that " You can go to top of the page and bottom of the page" by using Keyboard shortcut key while browsing the web. I have mentioned all the keyboard shortcut keys for Firefox and Chrome. But, at this time i will mention some specific shortcuts that would be helpful to you.

      Shortcut keys for going to top and bottom:

      For Jumping/Going to "Top" of The Page:

      Press Home button to jump to Top of the page which can be seen easily on Top of the arrow keys
      Button for Going Top

      For Jumping/Going To "Bottom" of the page:

      Press End button To jump to bottom of the page which can be seen easily on Top of the arrow keys
      Continue Reading >>

      What is Ubuntu(linux)?-How to install Ubuntu(Linux) latest version inside Windows using WUBI(Windows based Ubuntu installer) Offline?

      About Ubuntu:

      Ubuntu is a well-known Operating system (OS) like Windows.You can learn more at Wikipedia about Linux. It operates your system with a great performance and its programming is different. Many users don, t know about linux (ubuntu). Today, i will show you how to install it Inside windows with out using Virtual Machine.

      Installation:

      To install latest ubuntu within your Windows environment (XP/ Vista and Seven) we require two files.
      1.  wubi (Windows-based Ubuntu Installer)
      2.  Ubuntu desktop ISO file

      Download Link Wubi: http://www.ubuntu.com/download/desktop/windows-installer
      Download Link ISO file: http://www.ubuntu.com/download/desktop

      The above two files are the required files for ubuntu to install it inside windows offline. The process will install ubuntu Inside your Windows Environment.  No need of separate drive to install Ubuntu. It will install inside your windows and act as dual-boot Operating System. For every version of Ubuntu there is a different wubi. So try to download the accurate version of it. The above two download link will show the download link for the latest version for both the two files.

      Process:

      1. Download the above two files and place it inside a separate folder.
      2. Now right-click on the wubi.exe file and choose "Run as administrator"
      3. Now click on "ok" on the UAC (User Account Control ) prompt screen.
      4. It will open "Ubuntu Installer"
      5.There you will find 5 options.
      Screen shot:
      Installation Drive: Choose the drive where you want to install the Ubuntu.
      Installation Size: Allocate the memory for the Ubuntu on the installation Drive (Minimum 5GB)
      Desktop Environment: Choose Ubuntu
      Language: Choose your preferred language on which you want to install ubuntu.
      User Name: Add a user name for Ubuntu (By default windows username but you can also change it)
      Password: Set a password for Ubuntu User.

      6.  Click on "Install".
      7.  Now the installation process will start.
      8. After that it will ask to Reboot your System or Manually reboot later.
      9. After reboot you will find two operating system on your Windows boot menu.
      10. Choose "Ubuntu".
      11. Follow the instruction and complete the Process.
      After completion you will able to use ubuntu. That is it.
      Note: Ubuntu needs the driver update for each application to execute. So whenever you are opening an application for first time you make the driver updates by connecting to internet. Ubuntu install many of the hard ware driver automatically. So no need to install sound card, Graphic, Ethernet driver.
      Continue Reading >>

      Sunday 11 August 2013

      Give Thumbnails/Icons Any Desired Size(too big or too small) In Windows 7, Vista and XP Without applying any hack or configuration

      Hi, buddies. Today, i, m going to show you a simple hack to Make thumbnails of icons of any program or Video too big or Too small as You desire. When you right-click on background of Desktop, and go to View> it gives only three sizes/options  i-e small, medium and Large. But by this trick you will be able to make these thumbnails even greater or smaller than their original size to any size.  So, let, s know this Simple hack.

      Procedure:

      1. First of all You have to select a folder or place in which you want to resize the thumbnails. If you want to resize thumbnails showing on desktop, Then first click any blank space on desktop.
      2. Now, the next step is to resize thumbnails to bigger or smaller. To do this, Press and Hold Ctrl key and move your mouse wheel forward or backward. If you will move mouse wheel forward then thumbnails become bigger in size and if you move this backward then thumbnails become smaller in size.
      So, that was the simple trick. I hope you have not do such a simple and amazing trick before. Thanks for visiting and reading this post.
      Continue Reading >>

      Friday 9 August 2013

      How to Back-Up/Save favorite bookmarks in Mozilla Firefox and Restore them?

      Hello Firefox users, I, m showing you another trick to save your favorite bookmarks to a safe place. In the chrome there is already future to sync your bookmarks by creating an Google account and signing in But this feature is not available for Firefox users like me. Don, t worry You can also done this job by this trick. Bookmarks are actually Links that are stored in Browser,s memory. You can bookmark any site by pressing Ctrl+D button and You can also show these bookmarks in Firefox on Bookmarks toolbar (like chrome) by right-clicking on tab strip and checking on Bookmarks toolbar. So that, s another chapter, we are actually going to backup/save these important bookmarks. Carefully read the following steps...
      Also check: Speed up Firefox and make it a Fast fox.

      Steps for Backup/Save and restore of Your Bookmarks:

      • Press Ctrl+Shift+B to Open all bookmarks window.
      • From the top menu bar of this windows go to Bookmarks>Backup.
      • Choose a name for your file and location where you want to save it.
      • Now, bookmarks are stored in that location in the form of file with .json extension.
      • To restore your bookmarks by using that file, just go to Bookmarks>restore>Choose file (From menu bar of that window).
      • It will pop-up a window, now Double-click File that is stored in Your PC.
      That, s it in this way you can save and restore your Browser, s bookmarks in Firefox. Enjoy :)
      Continue Reading >>

      Thursday 8 August 2013

      Submit Your Blog/Website To 100+ Search engines With only One Click

      Hi bloggians, Every one of you want traffic and page views of your website. But some may face a lot problems by conducting their url/sitemap of your site to search engines. There are lots of search engines on Internet but someone is unable to submit its site to all these search engines. Amazingly there is a trick by which you can do this work with in a second. Carefully read this article as follows....

      How to submit your site/blog?

      • Procedure is so simple, Just go Rankontoponline website.
      • Submite your exact site url and Your Email.
      • Hit submit button.
      • Wait for a while until it informs you the submission form of your site.
      • Note: After submitted you website wait for until optimization, If you repeat this process with in 4 weeks you may get banned.
      That,s it this is the trick. Hope that this article was helpful to you. Enjoy :)
        Continue Reading >>

        How To Password Protect files and folders without using any Third party application in windows 7,vista,8,XP?

        Today, i will show you another folder trick. This trick is very simple to Protect files and Folders without using any third type of application or software. This is done by using a notepad. You don, t need any software.
        Sometimes you have to lock your folder and hide its files. You may use some softwares and other apps to done this, but in this tutorial you will learn to do this with out them. To done this, carefully read the content below...

        Procedure for locking and protecting a folder:

        • Open Notepad.
        • Copy and paste the following text in opened notepad
         cls
        @ECHO OFF
        title Secret Locker ----------------------- os-trickz.blogspot.com
        if EXIST "Control Panel.{21EC2020-3AEA-1069-A2DD-08002B30309D}" goto UNLOCK
        if NOT EXIST Locker goto MDLocker
        :CONFIRM
        echo Do you want to hide this Locker, to keep it safe from univited eyes ? (Y/N)
        set/p "cho=>"
        if %cho%==Y goto LOCK
        if %cho%==y goto LOCK
        if %cho%==n goto END
        if %cho%==N goto END
        echo Invalid choice.
        goto CONFIRM
        :LOCK
        ren Locker "Control Panel.{21EC2020-3AEA-1069-A2DD-08002B30309D}"
        attrib +h +s "Control Panel.{21EC2020-3AEA-1069-A2DD-08002B30309D}"
        echo Locker Secured !
        goto End
        :UNLOCK
        echo Enter your secret password to unhide the Locker:
        set/p "pass=>"
        if NOT %pass%== 123456 goto FAIL
        attrib -h -s "Control Panel.{21EC2020-3AEA-1069-A2DD-08002B30309D}"
        ren "Control Panel.{21EC2020-3AEA-1069-A2DD-08002B30309D}" Locker
        echo Locker visibility unlocked !
        goto End
        :FAIL
        echo Invalid password
        goto end
        :MDLocker
        md Locker
        echo Locker created successfully :)
        goto End
        :End


        change the highlighted text with your desired password.
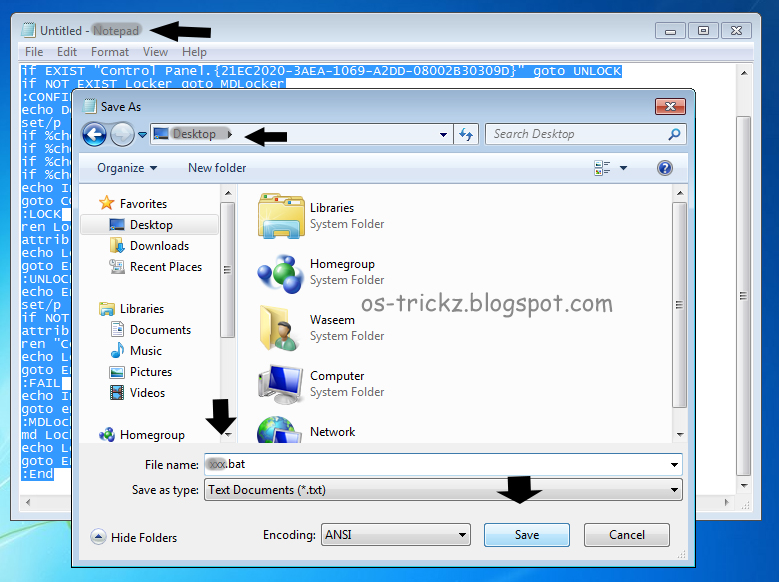
        • Now, save it as xxx.bat file (xxx is the name of file). [see screenshot of this step]
        • Copy or move this file to any place where you want to create an folder having protection.
        • Open it. It will create an folder named Locker in that place.
        • Now, again open this xxx.bat file and type Y to lock this folder.
        • This will hide and lock your folder.

        Procedure for Opening or un-locking folder:

        •  After locking/hiding a folder you should know about unlocking/un-hiding it.
        • Again open that xxx.bat file and type your password
        • This will un-hide that folder named locker and you can access the data.

        Procedure for Disabling Protecting:

        When you have un-locked the folder using above steps, Open that xxx.bat file and Type N instead of Y and folder will behave as a common folder.

        Saving  xxx.bat file to a secure place:

        You can save this xxx.bat file to any place. Then, to un-lock the folder you have to put that xxx.bat file to that location where you created the folder. In this way, you can manage and lock several folders by using only on xxx.bat file

        Downloadable xxx.bat File:

        If you cannot do this manually, I have also upload that .bat file and you can do this hack easily by download it by clicking here
          Continue Reading >>

          Wednesday 7 August 2013

          How to add Go to Top and Go to Bottom Button using Jquery in blogger?

          The Up and Down buttons can be used to navigate to the top and bottom of the page content, especially when on the main page there are many articles or when an article has too many comments. These buttons have a fade-In and fade-Out effect, this means that they will fade slightly when we are scrolling to the top or bottom of the page and additionally, have the function of going up/down the blog.

          Demo

          You can see a live demo on my blog, the buttons are located on the right side.

          How to put Go Up and Go Down buttons using the jQuery slide effect

          Step 1. Go to Template, click on the Edit HTML button
          Step 2. Make backup of your template.
          Step 3. Search (using CTRL + F) for the following piece of code:

          ]]></b:skin>

          Step 4. Just above this code, paste this one:

              /* Up and Down Buttons with jQuery
              ----------------------------------------------- */
              .button_up{
              padding:7px; /* Distance between the border and the icon */
              background-color:white;
              border:1px solid #CCC; /* Border Color */
              position:fixed;
              background: white url(https://blogger.googleusercontent.com/img/b/R29vZ2xl/AVvXsEhrumobMIAg0D_envxrxwg2ZGto2ITWI101UvIXapTz3RQNrXTOO5Ki0Y66TdKX3pVZy4QwS4qPY6obmCz6zfRzqnma2gCxJ67gpphV8UXQzMTROl4a59J9OYLjXAlLS8rs0mJdB2WVRiM/s16/arrow_up.png) no-repeat top left;
              background-position:50% 50%;
              width:20px; /* Button's width */
              height:20px; /* Button's height */
              bottom:280px; /* Distance from the bottom */
              right:5px; /* Change right to left if you want the buttons on the left */
              white-space:nowrap;
              cursor: pointer;
              border-radius: 3px 3px 3px 3px;
              opacity:0.7;
              filter:progid:DXImageTransform.Microsoft.Alpha(opacity=70);
              }
              .button_down{
              padding:7px; /* Distance between the border and the icon */
              background-color:white;
              border:1px solid #CCC; /* Border Color */
              position:fixed;
              background: white url(https://blogger.googleusercontent.com/img/b/R29vZ2xl/AVvXsEhp9TE9l4suGpC_CTPSVhalRfuT_D_-GYk3RtW-v2F9jKwjl0c8pk8hvfSUbMuPykkEA0ICZSDeMO89HeJrj8BwSPMZQrM1FneZ6FTGnA7HGEGAR7zwmjWf8P0niKO_r1EZwWdY6TT4Wwk/s16/arrow_down.png) no-repeat top left;
              background-position:50% 50%;
              width:20px; /* Button's width */
              height:20px; /* Button's height */
              bottom:242px; /* Distance from the bottom */
              right:5px; /* Change right to left if you want the buttons on the left */
              white-space:nowrap;
              cursor: pointer;
              border-radius: 3px 3px 3px 3px;
              opacity:0.7;
              filter:progid:DXImageTransform.Microsoft.Alpha(opacity=70);
              }

          Step 5. Now search (CTRL + F) for this tag: 


          </body>

          Step 6.
          And just above it, paste the following code:

              <script src='http://ajax.googleapis.com/ajax/libs/jquery/1.7.1/jquery.min.js' type='text/javascript'/>

              <div class='button_up' id='button_up' style='display:none;'/>
              <div class='button_down' id='button_down' style='display:none;'/>

              <script>
              //<![CDATA[
              (function(){var special=jQuery.event.special,uid1='D'+(+new Date()),uid2='D'+(+new Date()+1);special.scrollstart={setup:function(){var timer,handler=function(evt){var _self=this,_args=arguments;if(timer){clearTimeout(timer)}else{evt.type='scrollstart';jQuery.event.handle.apply(_self,_args)}timer=setTimeout(function(){timer=null},special.scrollstop.latency)};jQuery(this).bind('scroll',handler).data(uid1,handler)},teardown:function(){jQuery(this).unbind('scroll',jQuery(this).data(uid1))}};special.scrollstop={latency:300,setup:function(){var timer,handler=function(evt){var _self=this,_args=arguments;if(timer){clearTimeout(timer)}timer=setTimeout(function(){timer=null;evt.type='scrollstop';jQuery.event.handle.apply(_self,_args)},special.scrollstop.latency)};jQuery(this).bind('scroll',handler).data(uid2,handler)},teardown:function(){jQuery(this).unbind('scroll',jQuery(this).data(uid2))}}})();

              $(function() {
              var $elem = $('body');
              $('#button_up').fadeIn('slow');
              $('#button_down').fadeIn('slow');
              $(window).bind('scrollstart', function(){
              $('#button_up,#button_down').stop().animate({'opacity':'0.2'});
              });
              $(window).bind('scrollstop', function(){
              $('#button_up,#button_down').stop().animate({'opacity':'1'});
              });
              $('#button_down').click(
              function (e) {
              $('html, body').animate({scrollTop: $elem.height()}, 800);
              } );
              $('#button_up').click(
              function (e) {
              $('html, body').animate({scrollTop: '0px'}, 800);
              } );});
              //]]>
              </script>

          Step 7. Finally, Save your Template. Enjoy!
          Continue Reading >>

          How to find Serial key of Any software easily with out any software or app?

          Every Body wants to have some quality and useful software with easy to use in their laptop or personal computer. But the main problem which occurs is that the most of the software which attracts the users for their usage are obviously payable . Only very few good quality softwares are not in this list. So after finding a good software usually we go into internet world to find an actually working serial for for that particular software. So, i have decided to give you a solution of this problem to avoid my blog reader from wasting their precious time

          How to Find Serials of any Software from Google with a Small Trick ?

          • Now in the search field just type "Software Name" 94FBR and press enter.
          i take an example of finding serials of IDM on google as....
          screen shot
          So you will get a screen similar with the upper one.. In the upper pic I have searched for IDM 6.12  here. You can searched for any software you like. You just have to put your software's name in field of "idm 6.12" as shown in the upper pic.
          And that's it.. See all the results.. Visit any link from the search result and get your desired serials there.

          How this Trick Actually works ?

          So I know what you are must thinking. You are thinking that how this trick works in GOOGLE !! And what "94FBR" actually is !!
          For your knowledge we are sharing the method by which this trick works also.. Actually "94FBR" is part of serial of MS Office 2000 .. Which is one of the first popular and payable software for mango people like us. So in google when you search any software with that code (94FBR) google actually takes your search as "Hey Google ..give me the Serial for this Software!! " .. So google immediately finds those page which actually contains the serial or crack of that software.. No scam page will not be shown .. So you can easily find the serial ..
          Continue Reading >>

          Fix breaking out/overlapping of Images on Sidebar on bloggers Blog posts pages

          In some blogs there is a problem with post images i-e they are overlapping on sidebar which is not good for any blogger user. I have also faced this badness. But fortunately, i found an hack to limit the size of images on blog posts to not be shown as broken or overlapping on sidebar. i decided to post it on my blog. This hack is very simple and easy.
          To done this hack, just do the following...

          Procedure to fix images on blog posts:

          Step 1: Go to blogger>template>customize>advance> Add CSS.
          Step 2: Add following code in CSS section and then click on Apply on blog.
          .post img {max-width:98% !important}
          You can also go to template>edit html and then, paste this code before ]]></b:skin>

          That,s it. Now, you have fixed up your blog post images. This was a simple hack but very very helpful. Thanks for visiting.
          Continue Reading >>

          How to Take A "Screen Shot" Of Your PC Screen Without using any Third Party Application or Software in Windows 7, 8, vista and XP ?

          In this post. You will learn to take a screenshot of your PC screen With out using any third party software. This might be very liked by you. This trick is very handy and mostly used thing for Every PC. We frequently overcome situation when we want To take a screen shot Of Your PC, specially for Bloggers it is a very nice trick. Do you want to know the original content of This post? Let, s begin.....
          Also check: How to Create an invisible folder having no Icon and Name in windows seven, Vista and XP?

          Procedure of Taking A screen shot of Your PC screen:

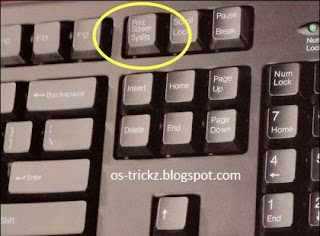
          1. To take a screen shot of your PC screen, You have to just Press a Button on your keyboard.
          2. The button is located at the top of right side arrows buttons As shown under.. 
          3. See the Screen shot
             
          4. By pressing this Button a screen shot is taken and is copied.
          5. You have to paste this copied screen shot of PC as picture Into some location i-e  paint or word.
          6. For this Open Paint/Microsoft word.
          7. To Open Paint. Go to start>all programs>accessories> Paint.
          8. Now, press Ctrl+V To paste your screenshot.
          9. Next step is to crop/cut a specific area of your Screen shot. To do this press Ctrl+Shift+X To select area for cropping and to make screen shot to look smoothly and professionally designed.
          10. Now, You can save your screen shot. To save it Press Ctrl+S, and then select location for saving.
          I hope this article was very helpful and very interesting. I hope that you enjoy my blog tutorials. Thanks for visiting.

            Continue Reading >>

            Sunday 4 August 2013

            Make A particular Image to be shown only in Home Pages and not be shown in Blog Post Pages

            The people using Auto Read More Hack use a suitable image for every post. Some images are not suitable to be shown on Post Pages. To hide images/pictures from your blog posts and to make them appear only in homepage, we have to add just a small piece of CSS code in our template and then use the class "hidepic" each time we want to hide an image, Just follow the next steps:

            Procedure:

            Step 1. Go to Dashboard - Template - Edit HTML
            Step 2.Make a Back up of your template.
            Step 3. Find (CTRL + F) this code in your template:

                    }]]></b:skin>

            Step 4. Copy and paste the following code just below it

            <b:if cond='data:blog.pageType != &quot;index&quot;'>
                <style>
                .hidepic{
                display: none;
                }
                </style>
                </b:if>

            Screen Shot

            Step 5. Save the Te mplate.

            Now every time you create a post, firstly add the pic you want to hide and then switch to HTML tab where you'll see the HTML code of the image you have added that will look something like this:

                <div class="separator" style="clear: both; text-align: center;">
                <a href="https://blogger.googleusercontent.com/img/b/R29vZ2xl/AVvXsEgAto2SX0-H1w3OmvgPZYmDEt13Jo0BK2cDikQwf4fZg6ntgYCApqZYIBlf3Ivtb7EHNAPKq50OOOJdUjOzpeuUaawj53ZABPjWZaMig13KnaH6DOgctdrY6C5LKAbUaSCDFsgI5oslQ6E/s1600/fire_bird_by_fhrankee-d32af8v.png" imageanchor="1" style="margin-left: 1em; margin-right: 1em;"><img border="0" height="320" src="https://blogger.googleusercontent.com/img/b/R29vZ2xl/AVvXsEgAto2SX0-H1w3OmvgPZYmDEt13Jo0BK2cDikQwf4fZg6ntgYCApqZYIBlf3Ivtb7EHNAPKq50OOOJdUjOzpeuUaawj53ZABPjWZaMig13KnaH6DOgctdrY6C5LKAbUaSCDFsgI5oslQ6E/s320/fire_bird_by_fhrankee-d32af8v.png" width="320" /></a></div>

            Note: it should be at the exact location where your image has been added
            (if the image is at the middle of the text, then the code should be found at the middle)

            Step 6. Replace "separator" with "hidepic" - see the screenshot below:
            If you need more help, please leave a comment below. Thanks for visiting.
            Continue Reading >>

            Search This Blog