Sunday 27 July 2014

Digital Al-Qur'an With English Translation Download

Al-Quran
Digital Al-Quran Download, Quran download karein
Assalam-o-Alaikum!

Brief description:

One can't write all the properties, dimensions and advantages of Al-QUR'AN, because this book is the most versatile. And why should IT not? IT is the book having words of our GOD. The hell and Janna is decided by this i-e the one who is follower of it will be successful and the one who doesn't believe and obey it will go to Hell. He'll be in Hell forever. During (570-638ء), these Holy Words were revealed  by ALLAH slowly slowly, not at one on Last Prophet MUHAMMAD (P.B.U.H). When a revelation came, those were learned, written, practiced, recited in prayers, etc. This Book has a big history. When MUSLIMS followed it. They were ruling over the world. They were dominant. They taught rules to govern, to administrate, to live and spend whole life, etc. They went and spread all over the world to give the MESSAGE OF GOD as ordered by ALLAH(GOD). So that no one would claim that he didn't hear or get the MESSAGE OF ALLAH on the Judgement Day. Today MUSLIMS are again struggling to get back that position.
There is a misconception that ISLAM was created and developed in (570-638ء) when MUHAMMAD (P.B.U.H) became the prophet of ALLAH. By the way, it was Dr. Zakir Naik. Actually, it started with the birth of first human i-e Adam (آدم). HE was the first prophet. Then, this process kept continued. Over 1,25,000 prophets are sent to this world to teach and preach the MESSAGE OF ALLAH. The most Major known divine Books are as follows:
  • Torah (Towrat) (Arabic:  توراة) given to Hazrat Moses (P.B.U.H) (Arabic: موسى)
  • Zabut (Arabic: زبور) given to Dawud (P.B.U.H) (Arabic: داود)
  • Injil (Arabic: إنجيل) given to Jesus (P.B.U.H) (Arabic: Isa, عيسى)
  • Al-Qur'an (القرآن) given to the Last Prophet Hazrat Muhammad (P.B.U.H) (Arabic: محمد)
We respect all the prophets of ALLAH. We believe all these religions and these divine books. But we also believe that these books have been altered and have many fabrications. You can notice that BIBLE is available to many of regions but it is not same. Same thing is for other books. But Al-Qur'an is not altered. You will find it with out any lying and fabrication. All the world's samples and copies of Qur'an are same. Not even a word is altered. However, translations may be different but original language i-e Arabic is still the same.
I'll not go to in detail. You can at least download this Holy Qur'an, and at least at least you should know about what ALLAH(God OF Universe) has ordered you, has said you, has taught you. May God bless you. (Ameen)

Download Digital Al-Qur'an:

Some Screen Shots:


Important Notice:

This software is uploaded for only to gain reward and ثواب. No other purposes are meant. May ALLAH accept it. Share this with your friends.
    Continue Reading >>

    Tuesday 22 July 2014

    OXFORD Advanced Learner's Dictionary 8th edition With Crack Free Download

    OXFORD Advanced Learners' Dictionary 8th edition With Crack Free Download

    About:

    The Oxford Advanced Learner's Dictionary, or OALD, is recommended by teachers and students because it defines words with authenticity, gives useful example sentences, and includes the help learners need to expand their vocabulary to 7500+ words.
    It has sold over 35 million copies worldwide and is the world's best-selling advanced learner's dictionary.
    The new 8th edition with Oxford iWriter, an interactive tutor to improve writing skills, offers 8 new reasons to choose OALD.
    This single pack contains:
    1. OALD Setup.
    2. Crack.

    Procedure for installation:

    1. Firstly, you have following two softwares installed in your PC: 
    Then, you can download dictionary by links provided below.
    2. Extract files by using software: winRaR.
    3. Mount iso-file, using Daemon Tool Lite by double-clicking on "Oxford Advance Learners' Dictionary 8th edition by Muhammad Waseem.iso". [see screen shot]
    OXFORD Advanced Learner's Dictionary 8th edition Installation


    4. Then go to virtual drive and double-click on it OR right-click and choose Install or run program from your media [see screen shot]
    iNSTALLING Dictionary

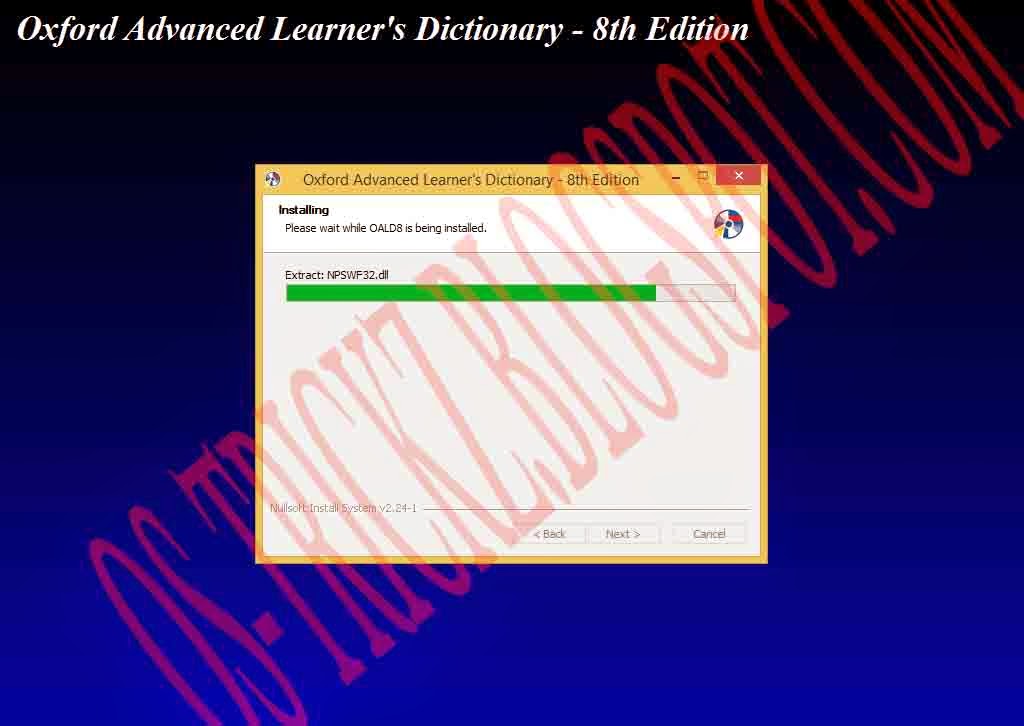
    5. It will start the installation process. Wait till the installation completes.[see screen shot]
    6. Now it's recommended that don't open or launch the application right now,you've to crack it by following process.

    Cracking OXFORD Dictionary:

    1. Just Open Crack folder.
    2. Copy the file named "oald8.exe".
    3. Go to installation directory (normally it's: "C:\Program Files\Oxford\OALD8")
    4. Just paste it here (it will ask you to Replace the file in the destination. Just do it) [see screen shot]
    cracking OALD8
    5. Enjoy.

    Download OXFORD Dictionary 8th edition:

    Note: If you want to keep these links alive then keep downloading from them frequently. At least you can do for me is to Share this post with your friends. If any link is dead just report me. 
    Continue Reading >>

    Wednesday 16 July 2014

    Microsoft Office Pro Plus 2013 Free Download

    Microsoft Office 2013 Pro Plus
    Assalam-0-Alaikum! Get ready for an exiting software i-e Microsoft Office Pro Plus 2013 x86 with Crack. Here is the procedure for installing and cracking this software with its features.

    Features:

    This one pack contains:
    1. Microsoft Access.
    2. Microsoft Excel.
    3. Microsoft Info Path.
    4. Microsoft Lync.
    5. Microsoft One Note.
    6. Microsoft Power Point.
    7. Microsoft OutLook.
    8. Microsoft Publisher.
    9. Microsoft Sky drive Pro.
    10. Microsoft Visio Viewer.
    11. Microsoft Word.
    12. Office Shared Features.
    13. Office Tools

    Procedure For Installation:

    1. Firstly, you have following softwares installed on your PC:
    2. Now, download the Microsoft Office 2013 from the links given below.
    3. Open it with WinRaR.
    4. Click On Office-2013-PPVL-x86-en-US-Feb2014.iso. [See screenshot]
    Opening with DAEMON Tools LITE
    5. Now, it will be shown at your Virtual Disc created by Daemon tools.
    6. Just double click on it OR right-click and Click on Install or Run Program from your Media. [See Screen Shot]
    Opening with DAEMON Tools LITE
    7. It will start the Microsoft Office 2013 Setup. Here the installation begins.
    8. When it's open, it will ask give you two options. Click on Customize.
    Installing Microsoft Office
    9. Now, choose features. By default the all will be chosen. So, not to choose it Click it, and choose unavailable. [See Screen Shot]
    Choosing Microsoft Office Features for Installation
     Note: Above two steps are optional. You can skip them by just clicking on Install Now rather on Customize.
    10. After Choosing Click On Install Now. Now, the installation process will be started. [See screen shot]
    Microsoft Office Installation

    11. Now, after it finishes. Click on Close.
    12. Now, it's time to crack it. For it read carefully below.

    Procedure for Registering:

    1. Just Open MTKV25.zip. This is also shown above in first screen shot.
    2. It will contain Microsoft Toolkit.exe. Just Open it.
    3. Click on Microsoft button to activate it. [See screen shot]

    Registering Microsoft Office 2013
    4. Now click on Activation tab. And then Click on Activate. [See screen shot]
    Microsoft Office Activation
    5. Enjoy....

    Download Links For Microsoft Office 2013 Pro Plus:

    Note: If you want to keep these links alive just keep downloading promptly.
    At least you can do for me, Share and spread this post... And please don't report Copyright issue. I'm not earning money from it. It's just for you.
    Continue Reading >>

    Tuesday 1 July 2014

    KM Player Keyboard Shortcut Keys Sets

    Assalam-o-Alaikum! fellas. Today you are gonna get some useful keyboard shortcut keys for KM Player:

    Shortcut Keys:

    Play/Pause:
    Space
    Play/Pause
    Esc
    Play/Pause + minimize to system tray
    Forward and Rewind:
    Right/Left arrow key
    Forward/rewind 5s
    Ctrl+[Right/left arrow key]
    Forward/rewind 30s
    Alt+[Right/left arrow key]
    Foward/rewind 1min
    Ctrl+Alt+[Right/left arrow key]
    Forward/rewind 10s
    Volume:
    Scroll Up/down
    Volume Up/down
    Up/down arrow key
    -
    M
    Mute
    Video Frame Size:
    Enter
    Full Screen/Window mode
    Ctrl+Enter
    Stretched full screen/Window mode
    Ctrl+Shift+Enter
    Overscan full screen/window mode
    Alt+1
    Half Size
    Alt+2
    Normal Size
    Alt+3
    x1.5 Size
    Alt+4
    x2 Size
    Contrast, Saturation and Brightness:
    H/W Contrast
    Z,X,C
    S/W Contrast
    V,B,N
    H/W Saturation
    A,S,D
    S/W Saturation
    G,H,J
    H/W Brightness
    Q,W,E
    S/W Brightness
    T,Y,U
    Bookmark Media:
    P
    Bookmark Any position
    Alt+[Page up, Page down]
    Next, previous Bookmarked position
    Subtitle Shorcuts:
    Alt+O
    Load Subtitle
    Alt+X
    Show/Hide Subtitle
    Alt+Q
    Load Subtitle Editor
    Alt+[F1/F2/F3]
    Increase/decrease/reset font size
    Miscellaneous:
    F1
    Help
    F2
    Preferences
    Alt+E
    Playlist editor
    Alt+G
    Control Box
    Ctrl+Z
    Close Playing file
    Alt+F4
    Close Media Player

    Continue Reading >>

    Friday 27 June 2014

    Blocking Adds on KMPlayer easily

    How to block adds in kmplayer?
    Assalam-o-Alaikum, having this type of player may irritate you that when it starts it displays some adds of movies, google......etc. You can get rid of all of these by using following device. Just do it carefully.

    Procedure:

    1. Press Ctrl+R key to open Run Window.
    2. Now write drivers and Press Enter.
    3. Just go to etc folder.
    4. Click on hosts file. For Windows vista,7... users you have to take ownership of the file. So use these simple steps:
    • Download file from here.
    • Open it.
    • Click on InstallTakeOwnership.reg and it will add a right-click option on every file.
    • Now right-click on hosts file and click on Take ownership. You have done. [See screenshot below]
      Taking ownership of File
    5. After taking ownership of hosts file, just open it with Notepad.
    6. At the end, just add the following code:
    0.0.0.0 player.kmpmedia.net
    7. Now Save and Exit.
    8. That's it. There will be no Adds in your PC. 
    Continue Reading >>

    Sunday 22 June 2014

    Make any Blogger' widget sticky

    Hey fellas! If you do blogging, then you must know to customize your template: How make any widget sticky? You should already know about Widget. Just Start here. I's always interested in finding a trick like that...

    Procedure:

    1# First You should know the Widget's ID, the  simplest way to do it is:
    • Open Widget to edit it. This edit button is shown right at down-right corner. Click it to open the edit-widget.
    • Now there will be a new opened window of your browser [may be different].
    • Just in the address bar, at the end, see the Widget's ID. Normally it is HTML1, HTML2 and so on. [See screenshot below]
      How to Find Widget's ID?
    2#  Now, Go to Template>Edit HTML.
    3# Press Ctrl+F to find something [you must choose the template-edit box by clicking it, first]. Write something like:
    </body>
    Hit Enter to find the above piece.
    4# Now, just above it. Copy and paste the following text:

    <script>
    //<![CDATA[
    bs_makeSticky("YOUR_WIDGET_ID"); // enter your widget ID here
    function bs_makeSticky(elem) {
    var bs_sticky = document.getElementById(elem);
    var scrollee = document.createElement("div");
    bs_sticky.parentNode.insertBefore(scrollee, bs_sticky);
    var width = bs_sticky.offsetWidth;
    var iniClass = bs_sticky.className + ' bs_sticky';
    window.addEventListener('scroll', bs_sticking, false);
    function bs_sticking() {
    var rect = scrollee.getBoundingClientRect();
    if (rect.top < 0) {
    bs_sticky.className = iniClass + ' bs_sticking';
    bs_sticky.style.width = width + "px";
    } else {
    bs_sticky.className = iniClass;
    }
    }
    }
    //]]>
    </script>

    <style>
    .bs_sticking {background:#f2f2f2 !important; position:fixed !important; top:0; z-index:9999; box-shadow:0px 10px 4px -5px rgba(0,0,0,0.3); margin-top: 0; position:relative\9 !important;}
    </style>


    5# Just replace YOUR_WIDGET_ID with your original ID [like HTML1, HTML2....] [See Screenshot Below]
    Making any blogger sticky.

    6# Now, your widget will be stick to the scroll, and will move with the scroll....Enjoy and don't forget to share.
    Continue Reading >>

    Search This Blog