Saturday 29 June 2013

How to Download Youtube Videos Directly Without Using Any Third party Application

Today i will show you how to download youtube videos directly with no software needed and no waiting time.Just do this. There are a lot of softwares and techniques by which you can download youtube videos but this one is unique...

Procedure:

1.Go to link of your youtube video which is to be downloaded.(e.g www.youtube.com/watch?v=QF--9W2JRiw)
2.Type "ss" before youtube.com.
3.Link may look like as:
www.ssyoutube.com/watch?v=QF--9W2JRiw
4.All work has done.
5.Now, It will redirect you on link from where you can download video directly.
6.Enjoy... :)
Continue Reading >>

How to Restart Firefox In Safe Mode?

This process will show you how to Restart Firefox In Safe Mode.Sometime we had to restart firefox to restore it to previous settings.By learning this You can open a new window with addons disabled.

Procedure:

1.Go to help>Restart firefox with addons disabled(select from menu bar,if not showing press ALT)
2.Then,It will give you two options
   *Restart in safe mode(meaning with no plugins and addons)
   *Reset firefox.
3.Choose what you want to do.
4.That,s it.
Continue Reading >>

Latest Winrar full version with key free download | How to make Evalution copy of Win-rar registered?

The process will show you how to make an Evaluation Copy of Win-Rar registered full version using the Crack. The crack is able to make any version of Win-Rar registered. The Evaluation Copy of Win-Rar works for 60 days after that it works but show an Error Message to activate.

Installation Process of Win-Rar Crack

1. Download and Install any version (latest) of Win-Rar.
2. Download the patch  or Crack from the below download link and Extract it to your desktop using any of RAR Archiever.
3. Open Run Window and type "%appdata%" and click on "Ok".
4. it will open "C:\Users\[Your Use Name]\AppData\Roaming".
5. Open "Winrar" folder there.
5. Copy all the downloaded file and paste them on that Win-Rar Folder.
6. Now reboot your system and After reboot you will find that your Evaluation Copy of Win Rar is now Full Version.That is it.
Download: Winrar Crack
Continue Reading >>

Windows 8 ALL Versions Activator free Download full working-Windows 8 permanent activator

Windows 8 all version Genuine Activation crack free download for Windows 8 Enterprise, Windows 8 Pro, Windows 8 single language and Windows RT, Windows 8 Core, Windows 8 professional - will show you how can we make Windows 8 Enterprise, Windows 8 Pro, Windows 8 single language and Windows RT, Windows core and Windows 8 professional version of Windows 8 to genuine without buying it using 3rd party application named 7pm Tech - W8 AIO Tool 1.1.0.1. This is an update to the previous article that described the process to make Windows 8 Pro genuine using Activator.
Also Check : How to make Windows 8 Fully Genuine with in seconds.

What is 7pm Tech - W8 AIO Tool 1.1.0.1

7pm Tech - W8 AIO Tool 1.1.0.1 is a 3rd party application used to make genuine Windows 8. It is known as the Windows 8 genuine Activator.It works on almost all version of Windows 8 like Windows 8, Windows 8 Pro, Windows 8 Enterprise, Windows 8 Core. It will make the all version of Windows 8 to genuine. By using this you can insert a new serial key to your installed Windows 8 and also make it to genuine activated.

Minimum requirement for the use of the Windows 8 Genuine Activation crack

1. The version of Windows must meet the minimum requirement for the Installation of Windows 8.
2. Microsoft .net framework 4.0.
3. Disable the antivirus program before trying the Activator.
4. Connect your PC to internet connection to receive updates from the Activator.

How to use 7pm Tech - W8 AIO Tool 1.1.0.1 

Also Check: How to Activate Windows 8.1 with KMS Pico 9.1.0 Final
1. Download the rar file from the below download link
2. After satisfying the minimum requiremet run the 7pm Tech - W8 AIO Tool 1.1.0.1.exe file As administrator.
3. It will open the 7pm Tech - W8 AIO Tool 1.1.0.1 Activation Window.
4. First select the versionof your Windows 8.
5. Then click on "Activate Windows 8".
6. Wait for some time to complete the activation Process.
7. After completion of Activation it will show you the expiration date of your Windows 8. Click on "OK"
7. That is it. Now check your Windows properties to know the Activation status of Windows 8.
8. Close all the open Windows and reboot your system for better use.
Download:7pm tech -W8 AIO TOOL 1.0.0.1.EXE
Password:  os-trickz.blogspot.com

Continue Reading >>

How to Install Microsoft .Net Framework 3.5 Offline In Windows 8 by CMD(command prompt)?

Now a days most of us are using Windows 8. While we use some updated Program, Apps, Games etc; we find a notification to install .Net Framework 3.5. To install it online we have to do a huge amount of download from the internet. But the setup of .Net Framework 3.5 is attached with the Windows 8 setup but it does not install by default installation of Windows 8. Today I will give you a trick to install .Net Framework 3.5 offline.

Procedure:

1. At first you need to insert Windows 8 boot DVD into your PC.
2.2) Then Right click on start menu and select “Command Prompt (Admin)” (See the image) to open Command Prompt in Administrator mode.
3
3.Then copy the following line of code and paste on to Command Prompt window and press enter.

Dism /online /enable-feature /featurename:NetFx3 /All /Source:F:\sources\sxs /LimitAccess

 Keep in mind that in the above code F:\ is the address of my DVD drive, in your case it may vary from mine one . So please check the DVD drive location of your PC from my computer after inserting the disk and place that on the above line of code before pasting on Command Prompt.
4. Now the screen will come like this:
5. Now wait for a few minutes. After installation completion of the feature the screen will come like this:
6.Now eject the DVD and enjoy the program, app, games that need .Net Framework to run.
Enjoy.

If you face any problems while installing .NET framework using this method , just drop a comment with details of the problem faced by you and we will help as soon as possible.

Continue Reading >>

Friday 28 June 2013

How to Increase Speed of IDM with IDM Optimizer?

IDM Optimizer is a mini tool to maximize the speed of Internet Download Manager(IDM) downloads.
With this you can boost your downloads with a little job of seconds.

Procedure:

1.Download IDM optimizer.
2.Exit IDM from system tray.
3.Open downloaded file.
4.Now , you have optimized your download speed.It will say something like this.
ENJOY.........
Continue Reading >>

Amazing Trick to Find Hidden Emails of your Friends in Facebook.

Hi all,
Today I will show you how to find hidden email id of your friends in facebook.That is amazing.
You can know full email id of your friends with just this simple trick.So, Get ready for amazing fun.

Procedure:

1.You have a yahoo id (if not,then make)
2.Sign in to Your Yahoo id.
3.Go to your inbox or Mail folder.

4.Click to Contacts menu.


5.Click on import contacts.
  
 6.Click on Facebook:


6.All the specific email addresses will be added instantly.
Enjoy!
Note: In pictures "Ultimatetricks1.blogspot.com" was my previous blog's address which i had changed..


Continue Reading >>

KMS autov1.6 free download To Activate Microsoft OFFICE 2013.

KMSAuto is the Automatic Key Management Service Activator for the Latest Microsoft Office 2013. It works well on both 32 bit and 64 bit (x86 and x64) edition of Microsoft Office 2013. As it is the portable version so it does not require the Installation.

Minimum Requirement for KMSauto

KMSauto requires Microsoft .net framework 4.0 to run. So before using the KMS auto you need to download and Install the Microsoft .net framework 4.0


How to use KMSauto

1. Download the KMSAuto.rar file from the below download link and Extract it using Winrar or any other RAR Archiever.
2. Right Click on the KMSAuto.exe and Choose "Run As Administrator".
3. Click on "OK" if the UAC (User Account Control) prompts asking for the confirmation.
4. Now the KMS Auto Window will be open. You will get the following option there.
A) Run Activation - Run KMSAuto for one-time activation
I) Install AutoKMS - Set daily reactivation of
U) Uninstall AutoKMS - Disable daily reactivation of
R) ReadMe - Output to the console this file
Q) Exit - exit with KMSAuto
L) Show License - printing messages on the license
G) Grab License - Copies PID computer is running

KMS Auto Office Microsoft Office 2013 Genuine Activator
5. Click on "I" and hit Enter. It Will Install the Key Management System.
6. After Installing the KMS it will ask to press Any key to continue. Just press any key.
7. Now Click on "A" and hit Enter.
8. It will activate the Unregistered version of Microsoft Office 2013.
9. After Completion it will show you the Confirmation message that "Activation Was Successful". Now press any key and continue.
10. Now press "Q" and hit Enter to Quit.
That is it. Now your Microsoft Office 2013 was Activated Successfully.
Continue Reading >>

How to Block a Website Manualy in Your computer for all Browsers With Out Using Any Third party Application?

Perhaps you're disciplined and want to block a website from yourself. (No more guilty pleasures per your New Years' resolution.) Maybe you've the proud owner of a child who surfs the web for less than appropriate material. Whatever the This action will require you to edit your Host file. Your host file is a computer file used to store information on where to find a node on a computer network.

Procedure:

1.Simply go to C:\WINDOWS\system32\drivers\etc
2.Now, Open file named "hosts".
3.Open with notepad.
4.Now write "0.0.0.0 www.facebook.com"( I have taken example of facebook. If you want to block other site simple replace your site url with www.facebook.com).
SEE FIGURE BELOW:
5.Your site is now blocked In All Browsers.

How to unblock it again:

TO unblock it simply remove the entered text in hosts file.
For windows 7 You have to take ownership to hosts file to make changes with it.
Continue Reading >>

How to take ownership in Windows 7 and Vista?


Taking owner ship of a file is not so simple but very important to make changes with it.Today, Guys I will show you how to take ownership in Windows 7
For windows 7 you have to take the ownership of hosts file for this follow following steps:

1. Select the file or folder whose ownership you want to take and right click of mouse on it and choose "Properties".
2. On the property window navigate to "Security" tab.
3. Click on "Advanced".

4. On the open advanced security option window navigate to "Owner" tab.
5. Now click on "Edit".
6. a new window for advanced security option will be opened.
7. you will find a table asking for "Change owner to". Now select the local user to which you want to take the ownership.
8. Below that you will find an check box "replace owner on sub containers and objects".
9. Just tick the check box.10. Now apply all the modified setting.
11. During apply the changes it will show an message "You do not have the permission to read the file or the contents of the directory. Do you want to change the permission of the file or folder to full control. All permission will be replaced if you press o.k".
12. Just ignore the message and Press o.k.
SEE ALSO:How to add option"TAKE OWNERSHIP" to right click menu of a windows file
Continue Reading >>

How to Add Defragment to the Right-Click Menu for a Drive?

After manually applying or downloading the hack, you’ll have a new item on the right-click menu for your drives…
Which will start up the command-line version of Disk Defragmenter (after accepting the UAC prompt)


Manual Registry Hack
Open up regedit.exe through the start menu search or run box, and then browse down to the following key:
HKEY_CLASSES_ROOT\Drive\shell

Create a new key under shell called “runas”, and then set the (Default) value to “Defragment”. If you want to hide this menu item behind the Shift key right-click menu, then add a new string called Extended with no value.

Next, you’ll need to create a key called “command” and set the default value to the following, which is the command to run defrag with the default options but show verbose output.
defrag %1 -v
You can alternately choose from one of the other defrag switches here if you’d like.
Downloadable Registry Hack
Simply download, extract, and double-click on either AddDefragToDriveMenu.reg (for the regular menu) or AddDefragToExtendedDriveMenu.reg (to hide behind the Shift key). There’s also an included removal script that will remove either one.
Download file from here
Continue Reading >>

How to Skip the Annoying "Use the Web service to find the correct program " Dialogue?

If you’ve used Windows for any length of time, you’ve likely tried to open a file with an unknown extension. Instead of getting a list of programs to open the file with, you get an annoying dialog asking you to use a web service to find a program. So how do we change this?
You can use a registry hack to force Windows to skip this dialog altogether, and give you a list of applications to use to open the file instead, just as if you had selected the second option.
When you double-click on a file with an unknown extension, Windows presents you with this irritating dialogue:

If you selected “Select a program from a list of installed programs”, you would get this much more useful dialog instead:


The registry hack will show you the second Open With dialog instead of that irritating first one.

Manual Registry Hack

Open regedit.exe through the start menu search or run box, and then browse down to the following key (create the key if it doesn’t exist)
HKEY_LOCAL_MACHINE\SOFTWARE\Microsoft\Windows\CurrentVersion\Policies\Explorer

Create a new 32-bit DWORD value on the right-hand side with the following values:
  • Name: NoInternetOpenWith
  • Value: 1
The change should be immediate, no need to restart anything. To reset back to default, set the value to 0 or delete the key.
Continue Reading >>

How to Remove "Shortcut" Text From New Shortcuts in Windows 7 or Vista?

A source of annoyance for many Windows users is the ” – Shortcut” text that is added to the name of newly created shortcuts, and every time you have to manually edit the shortcut and remove that text. Wouldn’t it be great if there was a registry hack for this?
Most long-time geeks will remember that there was a hack for Windows XP, and probably already know that the same hack works in Windows 7 or Vista as well.
Notice the ” – Shortcut” added to my pidgin icon.


Manual Registry Hack
Open up regedit.exe through the start menu search box, and then browse down to the following registry key:
HKEY_CURRENT_USER\Software\Microsoft\Windows\CurrentVersion\Explorer

On the right-hand side you’ll find a key that is just called “link”, with a default value of 1e 00 00 00. Open this key up and change the 1e to 00 instead, leaving you with 00 00 00 00.
You’ll have to log off and then back on to make this change take effect. Please note that this won’t affect existing shortcuts, only shortcuts that you create from now on.
To change the setting back, just change back to the 1e value, log off and back on.
Downloadable Registry Hack
I’ve provided these tweaks in a couple of registry hack files.
  • RemoveShortcutText.reg – Removes the shortcut text from new shortcut
  • RestoreShortcutText.reg – Restores the setting back to the default
  • Download file from here
Continue Reading >>

How to Add Any Application to the Windows Desktop Right-Click Menu?

If you want really quick access to launch a frequently used application without putting extra icons on your desktop, you can add that application to the context menu for the desktop with a simple registry hack. Here’s how to do it.


Adding Applications to the Desktop Context Menu

For today’s lesson we’ll show you how to add Notepad to the menu, but you could add any applications you want instead. The first thing you’ll want to do is open up regedit.exe through the Start Menu search or run box [Press windows+R key to open run box], and then browse down to the following key:
HKEY_CLASSES_ROOT\Directory\Background\shell

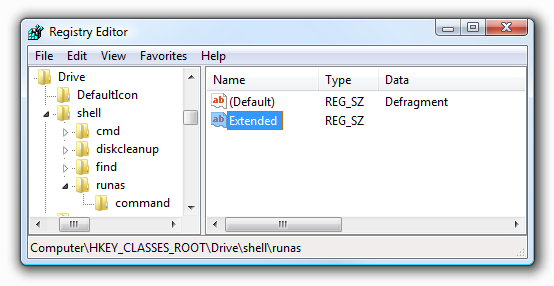
The screen should look similar to this one if you are in the right place.
Next, you’ll want to create a new key underneath the shell key, the name of which is exactly what is going to show up on the desktop menu. Right-click on the “shell” key, and then choose New \ Key from the menu.

Give the new key the name that you want to show up on the desktop context menu. For this example we’ll be using Notepad.

Optional: If you want to assign an “Alt” key to this menu entry for quicker access, you can change the (Default) value on the right and put an & character in front of the key you want to use. For instance, if you wanted to be able to just use the N key to launch Notepad once the desktop context menu pops up, you can do this:

Personally I don’t find this terribly useful since you have to use the mouse to right-click on the desktop… may as well just use the mouse to click the item. Still, for completeness I’ve included it.
Next you’ll need to create the command key that will actually hold the command used to launch the application. Right-click on the new Notepad key, and then choose New \ Key from the menu.

Give this key the name “command” in lowercase.

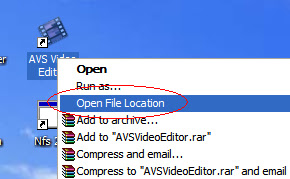
To complete this step you’ll need the full path to the application that you want to launch. You can use Shift + Right-Click to get the Copy as Path menu item to find this more quickly. Note: of course, for Notepad you wouldn’t need the full path, but this is just an example.


Now click on “command” on the left side, and then double-click on the (Default) key in the right side to edit the string value.
Paste in the full path to the executable that you got from the “Copy as Path” step above, or you can put in the full path yourself if you’d like.
Once it’s done, it should look like this:

And right-clicking on the desktop will produce the new menu item… naturally, using this menu item should launch Notepad.

You can add as many applications to the desktop context menu as you’d like, just repeat the steps again with a new menu item name.
Don't forget to share.... :)
Continue Reading >>

How TO Add "Take Ownership" to Explorer Right-Click Menu in Win 7 or Vista?

Taking ownership of system files or folders in Windows 7 or Vista is not a simple task. Whether you use the GUI or the command line, it takes far too many steps.
Here’s what the new right-click menu will look like after installing this registry hack.


Install, Download and unzip the files contained in the zipfile [Download it from link given below]. Double-click the InstallTakeOwnership.reg file and click through the prompts. No reboot necessary.

Uninstall
Double-click the RemoveTakeOwnership.reg file and click through the prompts. No reboot necessary.

Download Links:

Download file from here
Continue Reading >>

How to enable "copy to" and "move to" option with any file when you right click it?

Make your windows better by adding this feature.I will show you How to do This.
This feature will make you glad Specialy It is better for Windows 7 users.Because In windows XP there is option of "copy this file" and "move this file" in sidebar present of left side.So, it is more better and good for windows 7. Let,s start the lesson.

Procedure:


1. Now, open your notepad or any other text editor and Enter the following information:
Information for enable the copy/move option:-

Windows Registry Editor Version 5.00
[HKEY_CLASSES_ROOT\AllFilesystemObjects\shellex\ContextMenuHandlers]
[HKEY_CLASSES_ROOT\AllFilesystemObjects\shellex\ContextMenuHandlers\Copy To]
@="{C2FBB630-2971-11D1-A18C-00C04FD75D13}"
[HKEY_CLASSES_ROOT\AllFilesystemObjects\shellex\ContextMenuHandlers\Move To]
@="{C2FBB631-2971-11D1-A18C-00C04FD75D13}"
2. Now, save the file as xxx.reg i-e you have to give it a .reg extension.
3. Now open it. That's it.

Alternative Way:

1. Download a file from Here.
2. Just Open it.
3. You have done your job. It will automatically install it.
Continue Reading >>

How to activate New look of Facebook?

Today, I shall show you "How to activate new look of facebook?"
Facebook new look is amazing.If you want to activate new look in your account id.Then follow these simple steps.
Procedure:
1.Firstly, login to Facebook.
2.Then, go to this link:https://www.facebook.com/about/newsfeed
3.Scroll down page and click on "Try New Look" (also shown in below).
Now, enjoy new look, HAVE A NICE DAY AND PLEASE LIKE

Continue Reading >>

How to Add "Open File Location" in Right-Click menu of a shortcut in Windows XP?


Windows Vista and Windows 7 include the Open file location context menu item for Shortcuts, which help you quickly open the target folder of a shortcut. In Windows XP, it takes four mouse clicks to accomplish the task. To open the target folder of a shortcut in Windows XP, you need to right-click on the shortcut file, click Properties and click the Find Target button to open the parent folder of the target file or folder.
And an additional mouse click is needed to close the Shortcut Properties dialog.
You can add the Open file location feature in Windows XP (similar to what you have in Windows Vista) using one of the two methods. Method 1 uses a .REG file, and Method 2 uses a VBScript that I wrote. No additional shell extensions are needed!

Process:

 Installation.

1.Download registry file "open file location" from here.
2.Open it.
3.All work has done.You have added  "Open file location" option in right-click menu of a shortcut.Enjoy.

Uninstallation.

1.Download registry file "uninstall Open file location" from here.
2.Open it.
3.Un-installation is complete.
Continue Reading >>

Thursday 27 June 2013

How to enable graph search in Facebook?

Currently in beta, Facebook Graph Search allows users to search within their network of friends for answers to natural language questions such as, "Movies my friends who like The Hobbit liked" and receive direct answers, rather than the list of websites that search engines usually provide.

To enable Graph search in facebook:

1.Login in to your account.
3.Click on Try Graph search.
You have enabled your graph search
Enjoy.
Continue Reading >>

How to Use Trial Version software Forever Without Expiration BY Using Run as date?

About software.

RunAsDate is a small utility that allows you to run a program in the date and time that you specify. This utility doesn't change the current system date and time of your computer, but it only injects the date/time that you specify into the desired application.You can run multiple applications simultaneously, each application works with different date and time, while the real date/time of your system continues to run normally.

How it works?

RunAsDate intercepts the kernel API calls that returns the current date and time (GetSystemTime, GetLocalTime, GetSystemTimeAsFileTime), and replaces the current date/time with the date/time that you specify.

 Instructions to use:

1.Download Run as Date.
2.open it.
3.Browse file that you want to Run forever.
4.Select date and time.
5.Uncheck the "move the time forward........." (as shown in  figure).
6.Now,click on Create desktop shortcut.
7.You have to give it a specific name before creating shortcut.Write name beside it.
8.Now,  Run your trial program by clicking on shortcut you created,
Note:(Run as date does not work when trial of program has run out already).

Download link:

Download file from here.

Screenshot: 


Continue Reading >>

Search This Blog